Multi-Flo
– IEC 60601-2-24 compliant
– 1, 2 and 4 individual channel configurations
– Instant flow and pressure
– Compatible with all infusion devices

– IEC 60601-2-24 compliant
– 1, 2 and 4 individual channel configurations
– Instant flow and pressure
– Compatible with all infusion devices

Manual
Manual
Manual
Datasheets
| Flow Rare & Accuracy | |
|---|---|
| 701-1500ml/hr | 1+x)% of reading where x = 0.0033% x (flow rate -700ml/hr) |
| 10-700ml/hr | 1% of reading |
| 0.1-9.9ml/hr | 1% of reading + 0.005 ml/hr |
| Volume | 0.001 to 9999ml |
| Flow Update Rate | 1Hz |
| Flow Measurement | |
|---|---|
| Display Range | 0.010 to 1500ml/h |
| Max. Display Resolution | >10μl/h |
| Measured Range | 0.100 to 1450ml/h |
| PCA / Bolus Measurements (Volume) | |
|---|---|
| Display Range | 0.1 to 100ml |
| Measuring Range | 0.5 to 100m |
| Accuracy | ± 1% of the reading |
| Max. Resolution | 10μl |
| Basal Flow Rate | 1ml to 30ml/h |
| Pressure | Max. 2500mmHg |
| Occlusion/Back Pressure Measurement | |
|---|---|
| Pressure Measurement Range | -500 to 2500mmHg |
| Back Pressure Setting Range | -200 to 600mmHg |
| Accuracy | -500 to 1000mmHg ± 10mmHg[br] 1000 to 2500mmHg ± 1% of reading |
| Unit | mmHg, PSI, Bar, kPa |
| Resolution | 1mmHg |
| General Specifications | |
|---|---|
| Storage | 15 x 24h of testing at 1 second sampling rate |
| Dimensions | 300 x 204 x 220mm/11.8 x 8 x 8.6” (w x d x h) |
| Weight | 5kg/11lbs (1 channel)[br]6kg/13lbs (2 channel)[br]8kg/18lbs (4 channel) |
| Mains Supply | 90-264VAC, 50/60 Hz, 60W |
| Mains Cable | 1ml to 30ml/h |
| Storage Environment | 0–50°C / 32–122°F |
| Operating Conditions | 15–40°C / 59–104°F |
| Environmental Protection | IP40 |
| PC Communication | USB B |
| Keyboard Communication | USB A |
| Display | LCD color graphic display ¼” VGA |
How do I prime the Multi-Flo?
The Multi-Flo must be primed to fill the internal fluid path with test fluid and remove all air in order to provide accurate measurements. Optimum priming can be achieved using the supplied 3 port valve supplied with the Multi-Flo and a 60 ml syringe.
Follow the steps below to prime the Multi-Flo:
a. Ensure that the 3-portvalve is in the prime position as shownin figure 1 (see next page) then connect it to a Multi-Flo channel inlet.
b. Switch on the Multi-Flo.
c. Fill a clean 60 ml syringe with test fluid.
d. Ensure that all air is removed from the syringe.
e. Connect the syringe to the 3-port valve as shown in figure 1 (see next page).
f. Slowly discharge the syringe into the Multi-Flo until no air bubbles appear in the Multi-Flo drain.
g. If air bubbles are still appearing in the Multi-Flo drain when the syringe has been fully discharged
repeat steps c to f.
h. When no air bubbles are present in the Multi-Flo drain, the system is ready to make measurements.
i. Turn the 3-port valve to the position shownin figure 2 (see next page).
Note: The Multi-Flo measurement device will rotate as the priming fluid is injected
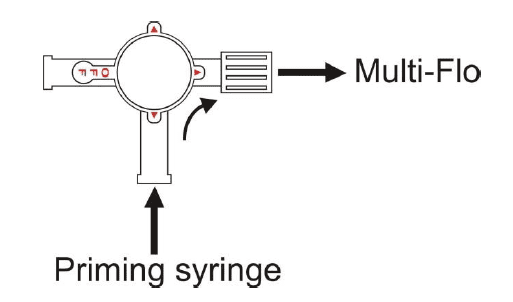
Figure 1

Figure 2
Making measurements:
Always use a new disposable syringe whentesting a syringe pump.It is advisable to lubricate the syringe
by drawing on the plunger a few times before loading the syringe with test fluid and installing it in the
pump.
Note: Administration sets which may have been used with saline or dextrose solution should not be used
with the Multi-Flo unless thoroughly cleaned beforehand.
After priming the Multi-Flo connect an administration set between the device under test and the 3-port valve as shownin figure 2.
Prime the device under test, administration set and 3-port valve with test fluid according to the manufacturer's instructions for the device under test.
When there is no air in the device under test and administration set the system is fully primed and ready to make measurements.
Turn the 3-port valve to the position shownin figure 3 to direct the flow from the device undertest to the Multi-Flo inlet.
What test fluids can I use for the Multi-Flo?
The following test fluids are accpetable for use with the Multi-Flo:
De-ionised water
Distilled water
De-ionised water/distilled water with approximately 0.1% Micro-90 cleaning solution
A 0.1% Micro-90 cleaning solution is the preffered test fluid as this will prevent the growth of organic material within the fluid path and also act as a wetting agent. This will reduce the likelihood of small air bubbles being trapped in the fluid path which could influence the measurement accuracy
Note: Do not use saline or dextrose solution as
a test fluid. IV administration sets which may have been
used with saline or dextrose solution should not be used with the Multi-Flo unless thoroughly cleaned
beforehand. If saline or dextrose solution is accidently used with the Multi-Flo, the unit should be cleaned
immediately using the process described in section 5
How do I clear the Multi-Flo of contaminants?
If the Multi-Flo is used with distilled or deionised water without Micro-90 additive, some contamination of the fluid path may occur over time. In order to maintain optimum measurement performance the following procedure should be used to clean the Mullti-Flo:
After prolonged storage
After 3 months of normal use
Immediately after accidental contamination with unauthorised test fluids
Each Multi-Flo channel should be cleaned as follows:
a. Prepare a solution of deonised/distilled water with 0.1% Micro-90 cleaning solution.
b. Fill a disposable 60 ml syringe with the cleaning solution and connect the syringe to the Multi-Flo inlet.
c. Connect a suitable container to the Multi-Flo drain.
d. Switch on the Multi-Flo.
e. Inject the cleaning solution into the Multi-Flo channel to be cleaned.
f. Leave for approximately 10 minutes.
g. Flush the Multi-Flo channel with 100 ml of deionised or distilled water at a rate of 200ml/hr.
h. Repeat steps 1 to 6 for each Multi-Flo channel.
Maintenances spares
Replacement priming kit: Part number 385A951
MICRO-90 Concentrated Cleaning Solution (1 litre): Part number 3854952
How do I download data from the Rigel devices to Med-eBase?
There are two ways to download data from the Rigel range which is dependent on which Rigel product you are using. The methods are divided into A and B:
A. Electrical Safety Analysers (288+, 62353+) and Vital Signs Simulators (Uni-Sim, BP Sim and SP-Sim)
B. Performance analysers (Uni-Therm, Uni-Pulse 400, Multi-Flo)
1) Downloading from any Rigel device to Med-eBase can be initiated from the Download option in the Tools menu or by using the Download icon on the taskbar (See Figure 1)
![]()
Figure 1. Download icon from Med-eBase.
2) After selecting the Download option, the Download from Tester dialogue box will be displayed depending on the tester. For Electrical Safety and Sim Range see Figure 2 and for Performance Analysers see Figure 3.
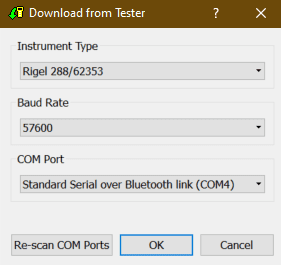
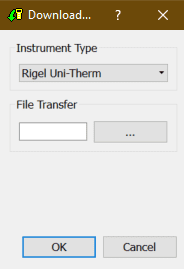
Figure 2. Method A Figure 3. Method B
3) With either method select the relevant Instrument Type from the drop down list.
Method A
Ensure you have the correct Baud Rate (the default is 57600) and COM Port selected. The COM port is defined by your Bluetooth connection. For data cable connection using RS 232 cable this will be COM1 and this will need to be set at 9600.
If you do not see the correct COM Port displayed in the drop down menu, select Re-scan COM Ports to refresh the available COM Port list.
Select OK to begin the download.
Note: The download is always initiated by the Rigel tester.
1) Select F4
2) Select D or Data Transfer and then D or Download to PC.
3) An hour glass appears in the right hand corner while the Rigel device pairs with the PC Bluetooth and should turn to a Bluetooth sign when it is connected.
4) F4 Send to send data to the tester.
Note: If using an RS-232 adaptor the device will say connected immediately. Please wait a few seconds between selecting download on Med-eBase and Send (F4) on the tester
To download to Med-eBase make sure the format is set to Rigel SSS. Once the download has started, a progress bar will appear. Upon completion of the download, the download window will close and a download report will be displayed showing the number of downloaded assets, the pass and fail status etc. of all the downloaded results.
Method B
Select the File Transfer button on the Download from Tester dialogue box to browse to your test instrument.
Browse to your test instrument and select the relevant SSS file then select Open. The file path will be added to the Download from Tester window.
Once the download has started, a progress bar will appear.
Upon completion of the download, the download window will close and a download report will be displayed including the pass and fail status of the downloaded assets.
What is the sample window setting on the Multi-Flo?
Instantaneous flow rate is based on the sample window setting. The calculation is delta volume / window size. The Multi-Flo requires a full sampling window size before displaying these values – for a 30 second window, the instantaneous and average values are the same until the 30 second point. It always uses the latest 30 second volume and refreshes every second.
For example, at the 60 second interval with a 30 second sample window, the instant flow rate is defined as: Volume at 60s – Volume at 31s / 30 Seconds.
How do I set up the Bluetooth scanner?
Can I print a multiple results for a group of assets on Med-eBase?
The print function can allow for an individual asset result or multiple result certificates to be printed. Results certificates must be of the same type (e.g. 288) and under the same client, in the asset browser, to be printed in multiples.
1) You would need to select the first asset from the main asset browse screen
2) Then while pressing ctrl select any additional assets. All selected assets should be highlighted.
3) Then select the Print icon on the right hand side and select the Device type.
4) Then select OK and the generate certificate menu opens to allow you to scroll through the certificates, set the template and add additional details etc before printing or saving the certificates as PDF.
How do I download data from the Rigel devices to the PC without Med-eBase?
Equipment required:
- Rigel device
- PC/Laptop
- Bluetooth connectivity or RS 232 cable
- DataTransfer.exe for file transfer
There are 3 ways to send test results from the Rigel device to a PC:
1) Bluetooth connection
2) Serial connection using the RS 232 cable
3) USB (Only applicable for Performance Analysers)
Bluetooth connection
To download via Bluetooth the download is always initiated by the Rigel tester and can be saved as:
i. Text file
ii. Csv file
iii. To Med-eBase as SSS file (Please see the FAQ ‘How Do I Download Data from the Rigel Devices to Med-EBase?’)
Make sure the PC and Rigel device are paired via Bluetooth Favourites on the device (Please see FAQ ‘What’s the process for pairing devices using Bluetooth favourites’)
For 288+ and Sim Range test instruments
1) Select F4 and then D Data transfer.
2) On the PC, open the DataTransfer.exe program (This is available as a free download from rigelmedical.com).
3) Select Capture then start capture (See Figure 1)

Figure 1. Start capture on DataTransfer.exe
4) Choose a save name and location and change the file type to either .csv or .txt and press Save (See Figure 2)
![]()
Figure 2. Save file type on DataTransfer.exe
5) Back on the Rigel device select D Download to PC then F4 to confirm
6) An hour glass appears in the right hand corner while the Rigel device pairs with the PC Bluetooth and should turn to a
Bluetooth sign when it is connected.
7) F4 Send to start sending data from the tester.
8) Once the transfer of data is complete go to the Datatransfer.exe program select Capture then stop capture.
9) The data will now be saved in your chosen location as either a csv or txt file.
Serial connection using the RS 232 cable (Rigel 62353+)
To download using RS 232 the connection use the same method as for Bluetooth however the COM port will always be through COM1.
For Performance Analysers (Uni-Therm)
1) Select Menu, then Data and Transfer Data (See Figures 3 & 4)
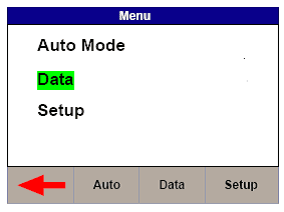
![]()
Figure 3. Uni-Therm Data Figure 4. Uni-Therm Transfer Data
2) Follow steps 2 to 4 from previous method.
3) On the Uni-Therm press F2 Format to change the file format to either CSV Full or CSV Summary for transfer to PC.
4) Press F3 Port to change the download port to Bluetooth (See Figure 5)
![]()
Figure 5. Changing the download port
5) Press F4 START to begin the transfer.
6) When the Data Transfer is complete follow steps 8 and 9 from previous method.
Serial connection using the RS 232 cable
To download using RS 232 the connection use the same method as for Bluetooth however the COM port will always be through COM1.
USB connection Performance Analysers only (Uni-Therm)
1) Install the ERT1557USB driver. (This driver is available as part of the Uni-Therm firmware download, or on request from support@rigelmedical.com)
2) Connect the USB lead between the Rigel unit and the PC.
3) Select Menu, then Data and Transfer Data
4) Select F2 Format and change it to USB.
5) Open DataTransfer.exe and select COM1 from the drop down menu and then set the Bits per second field to 115200 and click Apply.
6) Follow the steps from previous method using Datatransfer.exe program
How is instantaneous and average flow calculated on the Multi-Flo?
Average flow rate is based on the calculation of total volume / elapsed time.
Instantaneous flow rate is based on the sample window setting. The calculation is delta volume / window size.
The Multi-Flo requires a full sampling window size before displaying these values. For a 30 second window, the instantaneous and average values are the same until the 30 second point. It always uses the latest 30 second volume and refreshes every second.
For example, at the 60 second interval with a 30 second sample window, the instant flow rate is defined as: Volume at 60s – Volume at 31s / 30 Seconds.
Rigel Med-eBase Installer V2.6.2 (30 Day Trial included)
Rigel Medical Brochure
How can I upgrade the firmware on the Rigel Multi-Flo?
The Rigel Multi-Flo is designed to allow service agents and users to easily upgrade the firmware by using the internet to download the latest firmware. The firmware can then be installed using a USB stick.
The required upgrade firmware can be found at rigelmedical.com website.
Note: When downloading firmware from the Rigel medical website, the downloaded file is zipped and therefore you must unzip this on your PC then copy ONLY the file with extension; .tar.bz2.
Equipment required:
- Multi-Flo
- Multi-Flo Manual
- USB memory stick.
- Multi-Flo (Multi-Flo_firmware_update_AXX.tar.bz2
Note: XX is any number which varies with each new release.
1) Refer to the user manual to identify the F1 and F2 function keys.
2) Copy the firmware onto a USB stick in the correct file format (tar.bz2).
3) Press and hold F1 for 15 seconds, while switching on the Rigel Multi-Flo
4) Follow on screen instructions, Press F2.
5) Insert the USB memory stick containing a single copy of the firmware upgrade into the Rigel Multi-Flo USB port.
Note: Please make sure that there is no other files on the USB stick
6) Press F1; wait while the firmware is updated.
Note: If the USB stick is large i.e. more than 4 GB it might take few seconds for the Multi-Flo to see it so be a little patient before you press the update button.
7) The Rigel Multi-Flo will then show the message:
Update complete, restart the system or press F1 to return to the main screen
NOTE: There is only one update file which is set up to update up to four channels. Therefore if you have only a two channel Multi-Flo you will need to check that channels 1 and 2 has updated successfully. Any unused channels will come up with a failed to update Pic[x] message for the missing channel(s) which can be ignored.
8) Switch off the Rigel Multi-Flo
9) Remove USB memory stick
10) Restart the Multi-Flo in normal mode
Note: To obtain updates when the latest firmware is available, the Rigel Multi-Flo will need to be registered. This will also provide automatic upgrade alerts to the user.
How do I use Multi-Flo in Remote Control mode on Med-eBase?
To use the remote control mode the user will need to install the Gadget Serial V2.4 Driver. The Gadget serial driver is available at rigelmedical.com in the download section. To install the gadget serial driver the Multi-Flo needs to be turned on and connected to the PC using the USB serial cable.
Equipment required:
- Multi-Flo
- PC running Med-eBase V2.4 or higher
- Gadget serial driver install files
- USB Serial cable or memory stick
1) On the Multi-Flo menu scroll down and select remote control mode. The Multi-Flo will then try to connect with the PC.
2) The PC will attempt to download the install drivers for the gadget serial. As the driver is located on the PC and cannot be found on the internet this step is not required. Click on the icon when it appears as seen below.
3) Select “skip obtaining driver software” which is blue and underlined to stop widows looking for driver as the Rigel device won’t be able to connect to the PC while the computer is performing this task. Select yes on the driver software installation screen to skip the driver update.
4) Once this is complete open the Control Panel and go to ‘Devices and Printers’. The gadget serial will be an unspecified device. Right click on the gadget serial and select properties.
5) In the General tab select Update Drivers and then choose ‘Browse my computer for driver software’.
6) Select the folder where the gadget serial files are located. Select Ok to choose the folder and then next.
7) Once the driver is installed select next and then close the Control Panel.
To confirm the gadget serial driver is installed correctly:
8) Open Med-eBase V2.4making sure the Multi-Flo is connected and in Remote Control Mode.
9) On Med-eBase select ‘Download from Tester’ by either selecting Tools > Download or the icon.
10) Choose Multi-Flo as the instrument type and then select Gadget serial as the COM port.
Note: If Med-eBase was open while installing the gadget serial driver the user may be required to close Med-eBase and reopen it or Rescan
COM ports to locate the gadget serial.
How do I perform an occlusion test on B. Braun Space Series, Infusomat and Perfusor devices?
This document has been produced to aid in testing the B. Braun infusion pumps for the Space series, Infusomat and Perfusor occlusion performance. The B Braun pump has a unique auto rewind function when occlusion pressure limit is released to relieve the pressure and then continue to infuse when the pressure has been reduced.
Equipment required
- B Braun Pump and giving set
- Multi-Flo Infusion device
Optional:
- Med-eBase software for remote control (High resolution real time graphs)
1) Connect the Rigel Multi-Flo and B Braun infusion device
2) If using Med-eBase; connect the Multi-Flo to the PC using a USB cable and load Med-eBase V2.4 (or higher) software and open the remote control dashboard.
Note: Please see the Med-eBase manual for setting up the Multi-Flo to the PC software.
3) The occlusion test needs to be set up in Manual mode
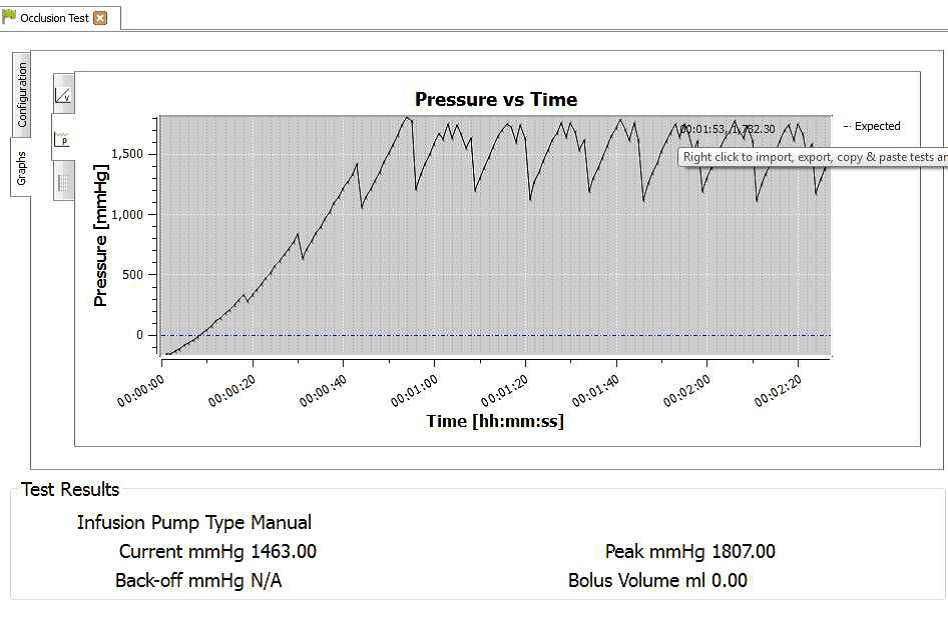
4) When the occlusion alarm sounds DO NOT press the green button on the Multi-Flo. This will allow the Braun device to reverse the pressure and begin to pump again. The user should end up with an image on screen or on the PC as follows:

5) Once enough results have been captured press the green button to stop the test or select manual stop in the software
6) If using the Multi-Flo as a standalone device in manual mode go back to the summary screen and select SAVE (F2); in
AUTO MODE these results save automatically. Download the results into Med-eBase using the USB cable. Detailed instructions on how to download can be found in the Med-eBase manual.
7) From Med-eBase the results can be viewed by searching for the Asset ID of the device. Select the TEST RESULTS tab and select the test. On the test results scroll down to the graph section and select the pressure graph.
8) Hover the mouse on the maximum and minimum points to record the pressure readings at each point.
9) Alternately the results can be exported as a CSV file fromMed-eBase to a location of your choice for further analysis.
Med-eBase remote control Multi-Flo
1) Open Med-eBase and select Tools > download. Select the gadget serial to open the Multi-Flo remote control dashboard.

2) Once the software is opened in remote control. Set up the occlusion test as a Manual Occlusion by select the correct channel and then Add Occlusion test. Select Start test and assign the test to an Asset ID.
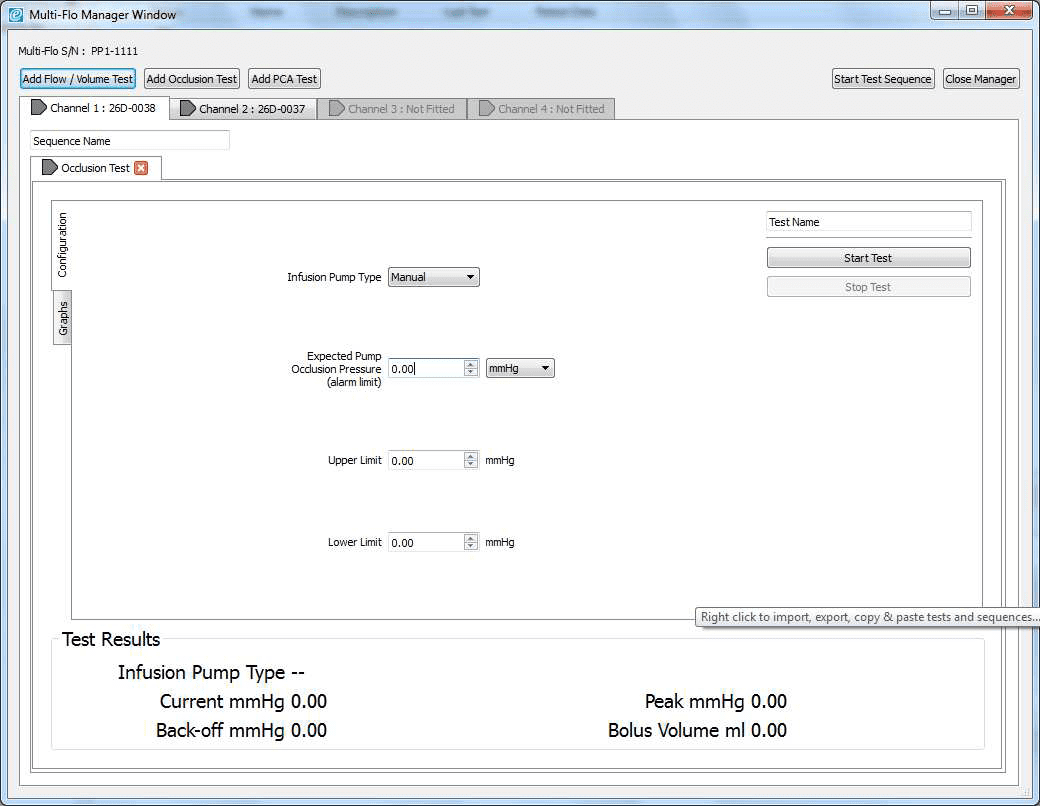
3) Allow the B Braun pump to reach the peak pressure limit a number of times before ending the test by selecting Stop Test in the Configuration tab. A user message will appear indicating that the test has stopped and to ask whether to save the results. Select Yes and the results are automatically saved to the Asset ID select at the start of the test.
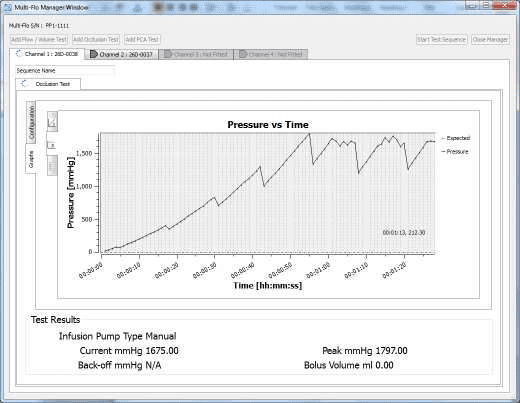

4) Once the test is complete the user can hover the mouse over specific points and record readings. From the service manual the pressure stages and ranges are indicated below:
Pressure stage 1 range 75 – 450 mmHg
Pressure stage 5 range 300-750 mmHg
Pressure stage 9 range 600 – 1050 mmHg
Example:
Pressure stage 1: 321mmHg
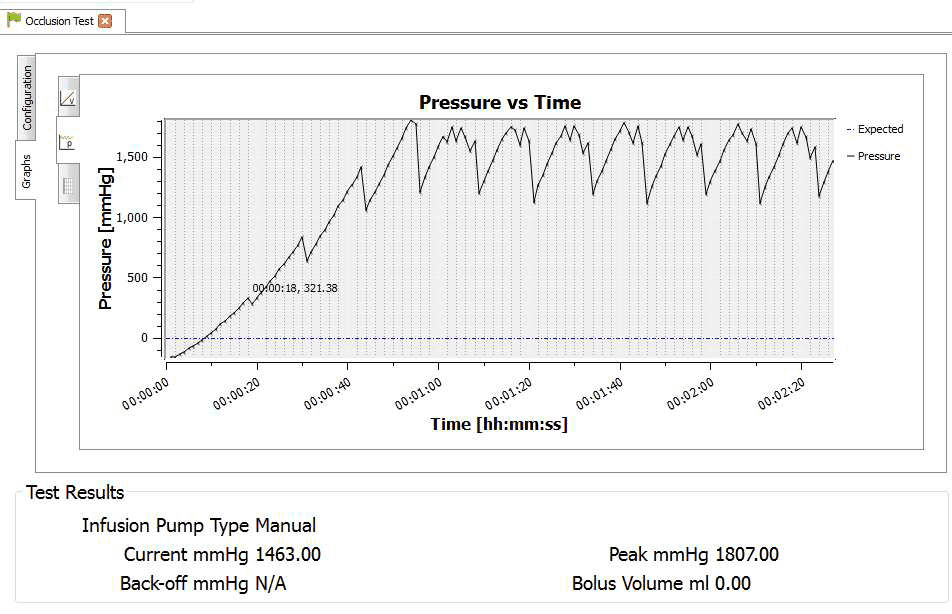
Pressure stage 5: 624 mmHg
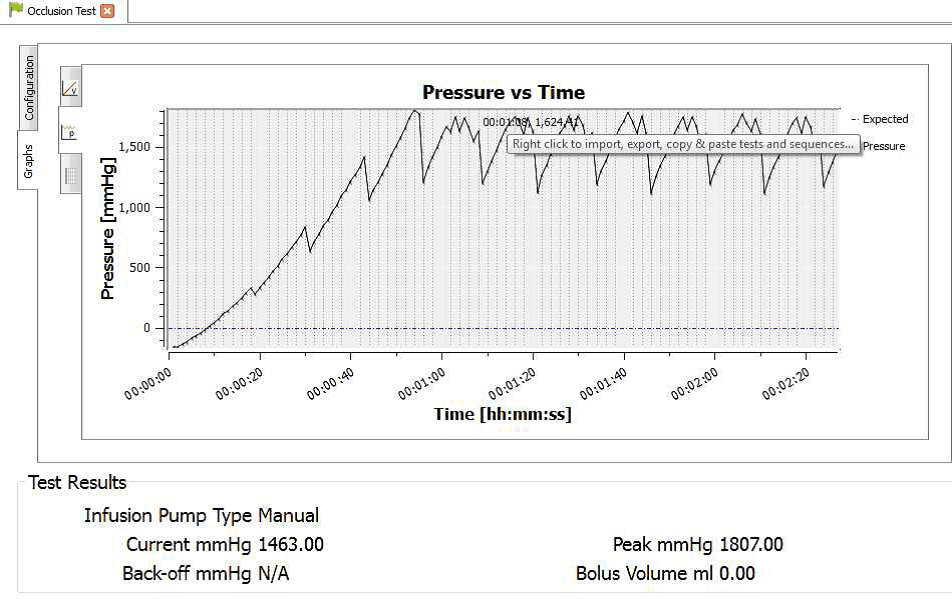
Pressure stage 9: 782mmHg
Multi-Flo Firmware v1.3.1-1
What is the function of the occlusion test on the Multi-Flo?
What is occlusion?
An infusion pump is an electronic device used to control the administration of intravenous fluids to deliver measured amounts at careful and regulated rates. They often incorporate mechanism or structure that mediated active transport across a biological membrane. Occlusion is the interruption or ineffective therapy of infusion due to a blockage, momentary closure or obstruction of the passageway or blood vessel.
How do infusion pumps manage occlusion?
Infusion pumps use a pumping action to infuse fluids, medication or nutrients into the patient and are suitable for intravenous, subcutaneous, enteral and epidural infusions. They provide accurate and controllable flow over a predetermined period of time or on demand.
Occlusion sensors can detect both upstream and downstream restrictions and the downstream occlusion sensor sensitivity can be adjusted to suit the needs of the patient/hospital through the pump configurations. Dynamic monitoring systems provide the ability to monitor downstream pressure or resistance allowing for rapid detection of full or partial blockages.
To prevent nuisance alarms and interruptions to therapy the initial occlusion pressure needs to be set above the systems normal running pressure e.g. to deliver simple electrolytes into an adult intravenously through a 16 G, 9 cm cannula at 100ml/h the pressures due to resistances are:
| Pressure (mmHg) | |
| Max adult venous pressure | 30 |
| Filter | 10 |
| Cannula | 100 |
| Administration set | 1 |
| Total | 141 |
Table 1: Downstream pressures
Therefore to administrate this infusion the occlusion alarm pressure should be set above 141mmHg. However, configuring the alarm to the lowest feasible occlusion pressure minimises the time to alarm and the possibility of post occlusion bolus.
Occlusion alarms are used to indicate when the pump is unable to sustain the set flow rate and therefore pressure in the line begins to increase. This is typically due to a partial or complete block in the delivery tubing e.g. kinks in the tube, clamp or tab closed; or in the cannula e.g. clotted off or a change in position.
To reduce the time to alarm:
• Use highest flow rate clinically acceptable for the infusion
• Use smaller syringe size
• Only use recommended syringes by the pump manufacturer to minimise stiction and normal variability in the driving force of the pump
• Use largest cannula practicable possible and configure the occlusion alarm at lower level
• Use a current generation syringe pump which has a “back off” or “Auto rewind” feature
Hazards and complication which arise because of occlusion include, interruptions to the therapy which can be a huge problem with critical, fast acting drugs e.g. inotropes and pumps continue to attempt to deliver fluid under the pre-set pressure in the line is reached which stops the pump and sets off the alarm. The compliance and flexibility of the tubing allows it to expand under increased pressure which can cause extra fluid to be released and delivered to the patient as a bolus when the occlusion is released.
What is the difference between auto rewind and normal stop/alarm function on infusion pumps?
To counteract the effects of occlusion including post occlusion bolus, modern pumps often have a “back off” or auto rewind facility, which briefly runs the pump in reverse when occlusion is sensed to reduce the pressure in the tubing.
How do you test occlusion on the Multi-Flo?
The Multi-Flo occlusion test simulates an obstruction in the infusion and monitors the variation in pressure due to the blockage. Most infusion devices have the ability to detect this obstruction and provide an occlusion alarm and the occlusion test can test this alarm feature. Some infusions devices have an auto rewind function at occlusion alarm and the Multi-Flo can detect that to display the maximum occlusion pressure at which auto rewind occurs. In infusion devices that do not have auto rewind (normal stop/alarm pumps) the user must press the Green button when the occlusion alarm sounds which will stop the test, record and display the maximum occlusion pressure observed.
What can I do to improve the performance of the Multi-Flo?
INTRODUCTION
The Multi-Flo is a precision instrument that must be properly maintained in order to achieve optimum measurement performance. The measurement principle uses a precise volumetric measurement over a known time period to calculate flow rates. Foreign material or air bubbles trapped within the measurement device will influence the volumetric measurement and consequently the flow rate measurement performance.
The volumetric measuring device must be able to rotate freely in order to operate correctly. Using inappropriate test fluids may leave a residue in the fluid path and impede the movement of the measurement device or ultimately cause total seizure.
Please note that damage resulting from the use of unauthorised test fluids is not covered by the warranty.
1. TEST FLUIDS
The following readily available test fluids are acceptable for use with the Multi-Flo:
De-ionised water
Distilled water
De-ionised/distiller water with approximately 0.1 % Micro-90 cleaning solution
A 0.1 % Micro-90 solution is the preferred test fluid as this will prevent growth of organic material within the fluid path and also act as a wetting agent. This will reduce the likelihood of small air bubbles being trapped in the fluid path which could influence the measurement accuracy. The unit should not be drained post testing. Keeping the channels wet will prolong the life of the instrument.
Note: Do not use saline or dextrose solution as a test fluid. IV administration sets which may have been used with saline or dextrose solution should not be used with the Multi-Flo unless thoroughly cleaned beforehand. If saline or dextrose solution is accidently used with the Multi-Flo, the unit should be cleaned immediately using the process described in section 5.
2. PRIMING
The Multi-Flo must be primed to fill the internal fluid path with test fluid and removeall air in order to provide accurate measurements. Optimum priming can be achieved using the supplied 3 port valve supplied with the Multi-Flo and a 60 ml syringe.
Follow the steps below to prime the Multi-Flo:
a. Ensure that the 3-port valve is in the prime position as shown in figure 1 then connect it to a Multi-Flo channel inlet.
b, Switch on the Multi-Flo.
c. Fill a clean 60 ml syringe with test fluid.
d. Ensure that all air is removed from the syringe.
e. Connect the syringe to the 3-port valve as shownin figure 1.
f. Slowly discharge the syringe into the Multi-Flo until no air bubbles appear in the Multi-Flo drain.
g. If air bubbles are still appearing in the Multi-Flo drain when the syringe has been fully discharged
repeatsteps c to f.
h. When no air bubbles are present in the Multi-Flo drain the system is ready to make measurements.
i. Turn the 3-port valve to the position shown in figure 2
Note: The Multi-Flo measurement device will rotate as the priming fluid is injected.

Figure 1
3. MAKING MEASUREMENTS
Always use a new disposable syringe when testing a syringe pump.It is advisable to lubricate the syringe by drawing on the plunger a few times before loading the syringe with test fluid and installing it in the pump.
Note: Administration sets which may have been used with saline or dextrose solution should not be used with the Multi-Flo unless thoroughly cleaned beforehand.
After priming the Multi-Flo, as described in section 3, connect an administration set between the device under test and the 3-port valve as shownin figure 2. Prime the device under test, administration set and 3-port valve with test fluid according to the manufacturer's instructions for the device under test.
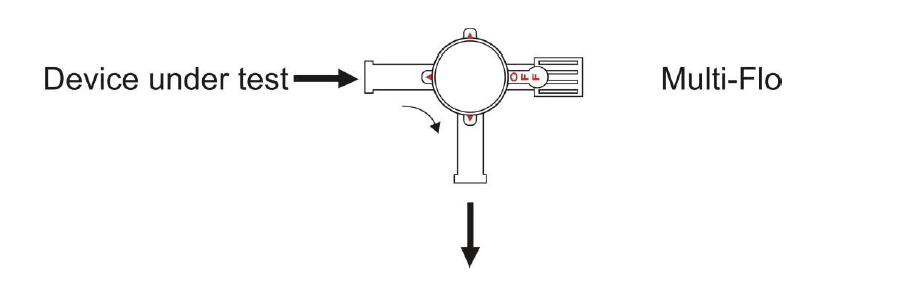
Figure 2
When there is no air in the device under test and administration set the system is fully primed and ready to make measurements.
Turn the 3-port valve to the position shownin figure 3 to direct the flow from the device undertest to the Multi-Flo inlet.
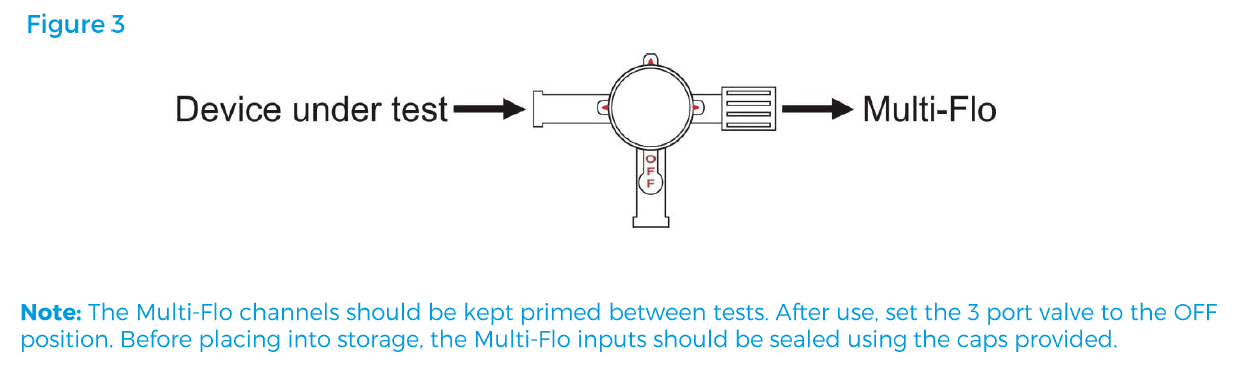
Note: The Multi-Flo channels should be kept primed between tests. After use, set the 3-port valve to the OFF position. Before placing into storage the unit should not be drained, as keeping the channels wet will prolong the life of the instrument. The Multi-Flo inputs/outputs must also be sealed using the caps provided.
4. CLEANING
If the Multi-Flo is used with distilled or deionised water without Micro-90 additive, some contamination of the fluid path may occur over time. In order to maintain optimum measurement performance the following procedure should be used to clean the Multi-Flo:
After prolonged storage
After 3 months of normal use
Immediately after accidental contamination with unauthorised test fluids
Each Multi-Flo channel should be cleaned as follows:
a. Prepare a 1% solution of Micro-90 using deionised or distilled water.
b. Fill a disposable 60 ml syringe with the cleaning solution and connect the syringe to the Multi-Flo inlet.
c. Connect a suitable container to the Multi-Flo drain.
d. Switch on the Multi-Flo.
e. Inject the cleaning solution into the Multi-Flo channel to be cleaned.
f. Leave for approximately 10 minutes.
g. Flush the Multi-Flo channel with 100 ml of deionised or distilled water at a rate of 200ml/hr.
h. Repeat steps 1 to 6 for each Multi-Flo channel.
5. MAINTENANCE SPARES
Replacement priming kit: Part number 385A951
MICRO-90 Concentrated Cleaning Solution (1 litre): Part number 3854952
Register your product today to activate your warranty and to stay up to date with the latest product updates, news and support information.
If you wish to calibrate your Multi-Flo, please locate the nearest service center or contact us directly using the link below.
Sign up to our mailing list today to stay up to date with the latest industry news and information from Seaward.

Contact us
Email: sales@rigelmedical.com
Switchboard: +44 (0) 191 586 3511
Phone: +44 (0) 191 587 8730