Uni-Therm
– Non-inductive loadbank from 0 – 5115Ω
– All IEC 60601-2-2 leakage tests
– Onscreen power profile analysis
– Onboard automation and data capture
– Full colour user-interface
Manual
Manual
Manual
Datasheet
Datasheet
Datasheet
RMS Bandwidth | |
---|---|
Instrumentation only | 30 Hz to 10 MHz (-3 dB) |
With loads: | 30 Hz to 2.5 MHz (-3 dB) |
Variable loads | 0 – 5115Ω, steps @ 5Ω (1023 steps) |
Accuracy | 1% of R |
Load array | Ceramic resistors (Non inductive) |
Measurement delay | Foot switch delay selectable between 200 – 5000ms (10mSec resolution) |
Specifications | |
---|---|
Power measurement | True RMS value of applied waveform |
Power rating | 0 – 500W (RMS) |
Accuracy | ±(2% of reading +10mA) |
Duty cycle | 100% up to 60 seconds |
Load bank | 0 – 5115Ω |
Resolution | 5Ω |
Voltage (peak) | 0 – 10kV (Peak) – Closed load only |
Voltage | 0 – 700V (RMS) |
Current | 0 – 6000mA (RMS) |
Crest Factor | 1.4 – 20 (Vpeak / V RMS) The higher of the two peak voltage measurements is used for calculation |
Return Electrode Monitoring | |
---|---|
Range | 1- 475Ω, steps @ 1Ω steps Motor driven potentiometer |
Alarm register | High and low, manual confirmation |
Ranging | Manual or automatic |
RF Leakage (High Frequency Leakage) | |
---|---|
Active | From active part to earth |
Passive | From plate – receptacle – to earth |
Variable see power measurement Fixed 2 x 200Ω | Load |
Isolation |
---|
10kV Isolation between measurement device and enclosure |
Low Frequency Filter |
---|
100 Hz filter to avoid low-frequency disturbance or interference |
Storage and Recall | |
---|---|
Memory | Approx 5,000 records |
Output | CSV and SSS format |
General Specifications | |
---|---|
Dimensions | 370 X 300 X 204mm |
Weight | 10 kg |
Operating temperature | 15 °C to 40 °C |
Storage temperature | 0 °C to 50 °C |
Mains power | 120/230 VAC +10%; 48 to 66 Hz, 35 VA |
Storage and Recall | |
---|---|
Memory | Approx 5,000 records |
Output | CSV and SSS format |
How do I download data from the Rigel devices to the PC without Med-eBase?
Equipment required:
- Rigel device
- PC/Laptop
- Bluetooth connectivity or RS 232 cable
- DataTransfer.exe for file transfer
There are 3 ways to send test results from the Rigel device to a PC:
1) Bluetooth connection
2) Serial connection using the RS 232 cable
3) USB (Only applicable for Performance Analysers)
Bluetooth connection
To download via Bluetooth the download is always initiated by the Rigel tester and can be saved as:
i. Text file
ii. Csv file
iii. To Med-eBase as SSS file (Please see the FAQ ‘How Do I Download Data from the Rigel Devices to Med-EBase?’)
Make sure the PC and Rigel device are paired via Bluetooth Favourites on the device (Please see FAQ ‘What’s the process for pairing devices using Bluetooth favourites’)
For 288+ and Sim Range test instruments
1) Select F4 and then D Data transfer.
2) On the PC, open the DataTransfer.exe program (This is available as a free download from rigelmedical.com).
3) Select Capture then start capture (See Figure 1)
Figure 1. Start capture on DataTransfer.exe
4) Choose a save name and location and change the file type to either .csv or .txt and press Save (See Figure 2)
Figure 2. Save file type on DataTransfer.exe
5) Back on the Rigel device select D Download to PC then F4 to confirm
6) An hour glass appears in the right hand corner while the Rigel device pairs with the PC Bluetooth and should turn to a
Bluetooth sign when it is connected.
7) F4 Send to start sending data from the tester.
8) Once the transfer of data is complete go to the Datatransfer.exe program select Capture then stop capture.
9) The data will now be saved in your chosen location as either a csv or txt file.
Serial connection using the RS 232 cable (Rigel 62353+)
To download using RS 232 the connection use the same method as for Bluetooth however the COM port will always be through COM1.
For Performance Analysers (Uni-Therm)
1) Select Menu, then Data and Transfer Data (See Figures 3 & 4)
Figure 3. Uni-Therm Data Figure 4. Uni-Therm Transfer Data
2) Follow steps 2 to 4 from previous method.
3) On the Uni-Therm press F2 Format to change the file format to either CSV Full or CSV Summary for transfer to PC.
4) Press F3 Port to change the download port to Bluetooth (See Figure 5)
Figure 5. Changing the download port
5) Press F4 START to begin the transfer.
6) When the Data Transfer is complete follow steps 8 and 9 from previous method.
Serial connection using the RS 232 cable
To download using RS 232 the connection use the same method as for Bluetooth however the COM port will always be through COM1.
USB connection Performance Analysers only (Uni-Therm)
1) Install the ERT1557USB driver. (This driver is available as part of the Uni-Therm firmware download, or on request from support@rigelmedical.com)
2) Connect the USB lead between the Rigel unit and the PC.
3) Select Menu, then Data and Transfer Data
4) Select F2 Format and change it to USB.
5) Open DataTransfer.exe and select COM1 from the drop down menu and then set the Bits per second field to 115200 and click Apply.
6) Follow the steps from previous method using Datatransfer.exe program
What is the process for transferring data between the Uni-Therm and Med-eBase?
This application note explains how to communicate results, test sequences etc. between the Rigel Uni-Therm and Rigel Med-eBase software.
Downloading results from the Uni-Therm to Med-eBase
On the Uni-Therm:
1) Go to Menu, Data, and Data Transfer.
2) In the Data Transfer menu the user must select USB PC Connection by selecting Port.
3) Then the correct Operation must be chosen. The operations are divided into Export or Import and also into format or type of file e.g. SSS, CSV Full, CSV Summary, Test Sequence, Results, Ref Graph. The user will need to select the appropriate operation which for downloading results would be Export SSS and then press Start.
4) Connect a USB cable between the Rigel Uni-Therm and the PC making sure you use the lower of the two
USB connectors on the side of the Uni-Therm
5) This will then lead to the Transfer Ready screen which will then tell you to copy the results file using Med-eBase.
On Med-eBase:
1) Select Download from Tester and select Uni-Therm.
2) Then press the ... button for the file transfer. From here you will need to save the results from the removal disk (which is the Uni-Therm) which will then download into Med-eBase.
Uploading Test sequences from Med-eBase onto the Uni-Therm
On the Uni-Therm:
1) Go to Menu, Data, and Data Transfer.
2) In the Data Transfer menu the user must select USB PC Connection by selecting Port key and Import Test Sequences using the Operation key
3) Then select Start
4) Connect the USB cable between the Rigel Uni-Therm and the PC
On Med-eBase:
1) Firstly the user would need to create a test sequence using Med-ebase.
2) Once the test sequence is created select ok to return to the main global sequence menu.
3) From the global test sequence menu select the sequence and then Upload. The screen below will then appear.
4) The user must make sure the correct instrument type is selected and then click on the … for file transfer.
5) Then select the removal disk (Uni-Therm) so save the sequence onto the Rigel device
6) Select Save and then Ok.
On the Uni-Therm
1) Select OK
2) Then the Import Complete screen should appear to indicate that the import is complete
3) To confirm the test sequence has been uploaded go back to the main menu select Menu, then Setup and then Test Sequences. In the Test Sequence screen the name of the global test sequence should be visible. From here the user can view and edit the test sequence or run the test on the Uni-Therm.
What’s the process for customising Med-eBase certificates?
1) All certificates are located in: C:ProgramDataRigelMed-eBase V2CertificatesTemplates for Windows 7 and Windows 10.
Note: ProgramData may be hidden folders. To view this folder in Windows 7 go to Organize then Folder, select the View tab and “Show hidden files and folders”, click Apply and then Ok. In Windows 10 select View, Options then select the view tab. Select “Show hidden files and folders”, click apply then OK.
2) Then select the relevant tester type folder e.g. Rigel 288_62353 (See Figure 1) and copy the relevant report folder e.g. _default (en).
Figure 1: Folder select for customised certificates
3) The copied folder needs to be renamed with a relevant name as this is what will appear on the dropdown list of certificate templates to choose from in Med-eBase E.g. "Customised", as shown in Figure 2.
Figure 2: Example of a customised folder
Note: If the customised template folder is not renamed it could be overwritten when new versions of Med-eBase are installed.
4) Select the copied folder and then open the file in either notepad or notepad++ to enable editing
Note: Notepad ++ provides an easier layout to follow as is an open source program which can be download from the internet.
5) Select Ctrl F and find the title which you want to customise. e.g. test protocol. However you can ONLY edit words with the character string "label"> :
and the new phase is entered in between the arrows. On Notepad ++ changeable these words are in black (See Figure 3).
Notice: On notepad ++ do not change any words in GREEN (See Figure 4) as this is information that comes from the Rigel tester. If this is changed the information will not be transferred from the results onto the certificate
Figure 3: Title customisation
Figure 4: Notepad++ word editing
6) Then open Med-eBase, select the test asset you want to print and then select the print icon. This takes you to the certificate screen where the dropdown menu for templates should include your customised template
How do I download data from the Rigel devices to Med-eBase?
There are two ways to download data from the Rigel range which is dependent on which Rigel product you are using. The methods are divided into A and B:
A. Electrical Safety Analysers (288+, 62353+) and Vital Signs Simulators (Uni-Sim, BP Sim and SP-Sim)
B. Performance analysers (Uni-Therm, Uni-Pulse 400, Multi-Flo)
1) Downloading from any Rigel device to Med-eBase can be initiated from the Download option in the Tools menu or by using the Download icon on the taskbar (See Figure 1)
Figure 1. Download icon from Med-eBase.
2) After selecting the Download option, the Download from Tester dialogue box will be displayed depending on the tester. For Electrical Safety and Sim Range see Figure 2 and for Performance Analysers see Figure 3.
Figure 2. Method A Figure 3. Method B
3) With either method select the relevant Instrument Type from the drop down list.
Method A
Ensure you have the correct Baud Rate (the default is 57600) and COM Port selected. The COM port is defined by your Bluetooth connection. For data cable connection using RS 232 cable this will be COM1 and this will need to be set at 9600.
If you do not see the correct COM Port displayed in the drop down menu, select Re-scan COM Ports to refresh the available COM Port list.
Select OK to begin the download.
Note: The download is always initiated by the Rigel tester.
1) Select F4
2) Select D or Data Transfer and then D or Download to PC.
3) An hour glass appears in the right hand corner while the Rigel device pairs with the PC Bluetooth and should turn to a Bluetooth sign when it is connected.
4) F4 Send to send data to the tester.
Note: If using an RS-232 adaptor the device will say connected immediately. Please wait a few seconds between selecting download on Med-eBase and Send (F4) on the tester
To download to Med-eBase make sure the format is set to Rigel SSS. Once the download has started, a progress bar will appear. Upon completion of the download, the download window will close and a download report will be displayed showing the number of downloaded assets, the pass and fail status etc. of all the downloaded results.
Method B
Select the File Transfer button on the Download from Tester dialogue box to browse to your test instrument.
Browse to your test instrument and select the relevant SSS file then select Open. The file path will be added to the Download from Tester window.
Once the download has started, a progress bar will appear.
Upon completion of the download, the download window will close and a download report will be displayed including the pass and fail status of the downloaded assets.
What is the process for uploading and downloading test sequences between the Uni-Therm and Med-eBase?
This application note explains how to upload global test sequences created in Med-eBase onto the Rigel Uni-Therm, how to download test sequences created on the Uni-Therm into Global test sequence on Med-eBase.
Upload a global test sequence
On the Rigel Uni-Therm:
1) Go to Menu, Data, and Transfer Data.
2) In the Data Transfer menu the user must select USB PC Connection by selecting the Port key and Import Test Sequences using the Operation key. Then select Start
Note: DO NOT press OK as this will end the upload
3) Now connect the USB cable between the Rigel Uni-Therm and the PC making sure you use the lower of the two USB connectors on the side of the Uni-Therm.
On Med-eBase:
4) Firstly the user would need to have created a global test sequence on Med-eBase.
5) To upload the test sequence select either Tools> Global Test Sequence or the page icon on the top left hand side of the Med-eBase screen to open the Global Test Sequence menu.
6) Highlight the test sequence(s) that shall be uploaded and select Upload from the right hand side of the screen.
7) The upload global test sequence menu will appear and the user must indicate the instrument type. Then select the file transfer icon.
8) Then the user must select the removal disk which is the Uni-Therm memory (for example removal disk E:) to allow the test sequence to be saved onto the Uni-Therm.
9) The file must be named in the format Sequence_FileName.sss (Where File name can be anything e.g. SEQUENCE1) and then select Save.
10) Then select OK to upload the sequence onto the Uni-Therm. Go back onto the Uni-Therm
11) Select OK from the Import data screen,
12) Then the Import Complete screen should appear to indicate that the import is complete
To confirm the test sequence has been uploaded
13) Go back to the main menu select Menu, then Setup and then Test Sequences.
14) In the Test Sequence screen the name of the global test sequence should be visible.
15) From here the user can view and edit the test sequence or run the test on the Uni-Therm.
B) Download test sequence created on Uni-Therm
1) Test sequences can be created, copied and edited in the Uni-Therm from Menu > Setup> Test Sequences
2) To download the Test sequence from the Uni-Therm to Med-eBase where it can be used as a global test sequence go to Menu> Data> Data transfer
3) In the Data Transfer menu the user must select USB PC Connection by selecting the Port key and Export Test Sequences using the Operation key.
4) Then select Start and connect the USB cable between the device and the PC
5) Open Med-eBase and select download from tester by either Tools > Download or the download icon
6) Chose the instrument type and then select the file transfer icon
7) Then the user must select the removal disk which is the Uni-Therm memory (for example removal disk E:) to allow the test results to be transferred from the Uni-Therm.
8) Select the appropriate file which should be in a format of Sequence_X_Y.sss.(Where X and Y are numbers) and then select OK
9) The file name should appear in the file transfer window and then select ok to transfer into Med-eBase
10) A download report will appear when the transfer is complete to indicate what has been transferred
11) To view the global test sequence in Med-eBase select either Tools > Global Test Sequence or the icon on the top left hand side of the Med-eBase screen to open the Global Test Sequence menu. From this menu the test sequence can be viewed, edited and uploaded onto the Uni-Therm.
Can I print a multiple results for a group of assets on Med-eBase?
The print function can allow for an individual asset result or multiple result certificates to be printed. Results certificates must be of the same type (e.g. 288) and under the same client, in the asset browser, to be printed in multiples.
1) You would need to select the first asset from the main asset browse screen
2) Then while pressing ctrl select any additional assets. All selected assets should be highlighted.
3) Then select the Print icon on the right hand side and select the Device type.
4) Then select OK and the generate certificate menu opens to allow you to scroll through the certificates, set the template and add additional details etc before printing or saving the certificates as PDF.
Rigel Medical Brochure
Uni-Therm Firmware
What is the calibration procedure for the Covidien Force TriadTM using the Rigel Uni-Therm?
The Uni-Therm can perform the Power Calibration and External Sensor calibration. For other calibration requirements: such as the Utility Calibration, refer to the Covidien Service Manual. For a step-by-step video guide on Force Triad preventative maintenance using the Uni-Therm please visit: https://www.youtube.com/watch?v=lOW9_vD8o24&t=3037s
Equipment required:
- Force Triad TM
- Uni-Therm
- Associated cables
Power Calibration
RF Leakage Calibration:
Note: The Covidien training manual provides the following pictorial.
Note: For utilizing the Uni-Therm, connect the patient return of the generator to the left white jack on the side of the Uni-Therm. Connect the right side white jack to the rear ground lug of the generator.
1) On the Main menu of the Uni-Therm select Power Test and then External Load and then zero (0) ohms.
2) Set test time to 255 seconds, with 5 seconds on, 5 seconds off.
3) Start the test on the Uni-Therm, monitor the current reading on the Uni-Therm’s display, and follow the directions provided on the Triad’s display. If needed, re-start the Uni-Therm test to finish the adjustment.
Voltage Calibration
Note: The Covidien training manual provides the following pictorial.
1) Set the Uni-Therm to Power Test and then Continuous
2) Set the test time to 255 seconds, with 5 seconds on and 5 seconds off.
3) Connect the left jack of monopolar output to the red jack on the side of the Uni-Therm.
4) Use a link to connect the black jack to the white jack.
5) The REM cable (without male clear pin) connects to the right side white jack and back to the patient return input on the generator. (Set up is identical to a monopolar power test.)
6) Follow the instructions on the Triad’s screen while monitoring current on the Uni-Therm’s display.
Current Calibration
Note: The Covidien training manual provides the following pictorial.
1) Select Power Test on the Uni-Therm
2) Select External Load and set resistance value to zero (0) ohms.
3) Connect left jack of bipolar output to the left white jack on the Uni-Therm.
4) Connect the right white jack to the right jack of the bipolar output. (Be sure the banana jack cables fit into the Ligasure outputs.)
5) Set test time to 255 seconds, with 5 seconds on, 5 seconds off.
6) Follow the instructions provided on the Triad’s display while monitoring the current shown on the Uni-Therm’s display.
External Sensor Calibration
REM Calibration:
Note: The Covidien training manual provides the following pictorial.
Note: Rather than the need for an external decade box, the Uni-Therm’s REM load provides the variable resistance needed.
4) Connect the patient return input of the generator to the REM output of the Uni-Therm.
5) Select REM and select manual up and follow the instructions displayed on the Force Triad.
Auto Bipolar Calibration
Note: Possible with Uni-Therm serial numbers with xxF xxxx or higher. Contact your Rigel Medical, Seaward Group office for upgrade information. Otherwise, follow instructions calling for an external resistance decade box.
Note: The Covidien training manual provides the following pictorial.
Note: Rather than the need for an external decade box, the Uni-Therm’s REM load provides the variable resistance needed.
1) Set the Uni-Therm for a Power Test.
2) Rather than conducting a power test, connect the generators Bipolar output to the top red and bottom black jacks on the side of the Uni-Therm.
Note: This allows the power load resistor bank to mimic the decade box.
3) For zero ohms, connect a shorting jumper across the variable resistor.
4) Follow the instructions as provided on the generator’s operating screen.
How do you upgrade the firmware on the Uni-Therm?
The Rigel Uni-Therm is designed to allow service agents and users to easily upgrade the firmware by using the internet to download the latest firmware. The firmware can then be installed using a USB stick.
The required upgrade firmware can be found on the rigelmedical.com website.
Note: When downloading firmware from the Rigel medical website, the downloaded file is a self-extracting .exe which will produce the required file.
Equipment required:
- Uni-Therm(or Rigel 377+)
- Uni-Therm Manual
- USBmemory stick.
- Uni-Therm (unitherm_firmware_update_AXX.tar.bz2
- OR Rigel 377+ (esa377plus_firmware_update_AXX.tar.bz2
Note: XX is any number which varies with each new release.
1) Refer to the user manual to identify the F1 and F2 function keys.
2) Copy the firmware onto a USB stick in the correct file format (tar.bz2).
3) Press and hold F1 for 15 seconds, while switching on the Rigel Uni-Therm/377 +.
4) Follow on screen instructions, Press F2.
5) Insert the USB memory stick containing a single copy of the firmware upgrade into the Rigel Uni-Therm/377 + USB port.
6) Press F1; wait while the firmware is updated.
7) Rigel Uni-Therm/377 + will then show the message:
Update complete, restart the system or press F1 to return to the main screen
8) Switch off Rigel Uni-Therm/377 +
9) Remove USB memory stick
10) Restart the Uni-Therm(or Rigel 377+) in normal mode
Note: To obtain the latest firmware, the Rigel Uni-Therm will need to be registered. This will also provide automatic upgrade alerts to theuser.
How do I download test sequences to the Uni-Therm?
The file download has the most common test sequences available for the Uni-Therm. See below for the full list.
How to download the test sequences:
1. Download the file to an empty memory stick.
2. Connect the memory stick to the Uni-Therm USB slot.
3. Go to Menu-Data-Transfer Data- select Import test sequences using the F2 button- Select Memory stick in the port area using F3, then select F4 to start the transfer.
4. To make sure you have successfully downloaded the test sequences- from the home page press Menu- Set Up - Test Sequences. You will see the list of test sequences available.
Please note that we are not responsible for the use of these test sequences and they should be used in conjunction with the OEM service procedure.
Bovie Aaron 950 |
Bovie IDS Series |
Conmed CB200 Beamer plus Argon |
Conmed CE6000 Beamer |
Conmed Hyfrecator 2000 |
Conmed System 5000 |
Conmed System 7550 |
Covidien Valleylab Force 2 |
Covidien Valleylab Force FX |
Covidien Valleylab FT10 |
ERBE 300 VA |
ERBE ICC 200 |
ERBE ICC 300 |
ERBE ICC 350 |
ERBE VIO 200S |
ERBE VIO 300 |
ERBE VIO 300D |
Medtronic AEX |
Medtronic Covidien ValleyLab Force Triad |
Medtronic Ligasure |
MEGADYNE MEGAPOWER |
Olympus ESG-100 |
Olympus ESG-400 |
Olympus PSD-20 |
Olympus PSD-30 |
Olympus PSD-60 |
Olympus UES -30 |
Olympus UES-40 |
Valley Force 1 |
ValleyLab FX |
Valleylab FX 8C |
ValleyLab FX-C |
Vesalius |
WOLF |
How do you upload a Power Reference Graph to Med-eBase?
This guide will take you through the steps required to upload a Power Reference Curve to the Rigel Med-eBase software for use when creating a test sequence for the Rigel Uni-Therm Electrosurgical Analyser.
Equipment required:
- PC with Med-eBase software
- Reference Graph
Note: You will require two reference curves, one for the upper limit and one for the lower limits for each specific device
Create Reference Curve
1) Open the file ‘RefGraphtemplateMB.csv’ which accompanied this document as a download fromRigelmedical.com. Please
see the example below also:
[REFGRAPH],
Graph Name,
10,
100,1100,
200,1200,
300,1300,
400,1400,
500,1500,
600,1600,
700,1700,
800,1800,
900,1900,
1000,2000,
[END],
Note: One comma is required at the end of every line and between numbers. Therefore when the curve is created in excel please reopen the curve in notepad (or similar) to check locations of commas is correct.
2) [REFGRAPH] and [END] must remain at the beginning and end of the file.
3) Graph Name is the name of the reference curve and can be changed. This will be the name of the graph which will be shown once imported into Med-eBase.
4) 10 is the number of points on the graph, this can be changed but the lines of data must reflect this number.
5) Column A in excel should be the X axis, and represents the Load (). Column B is the Y axis and represents the Power (W). In this example line 3 is a plot of 100Wat 100. In Excel commas are not required but please check they are visible in notepad/word format.
6) Once you have completed plotting the point in the CSV file, Select File and then Save As. Save the file with a recognisable name and .txt extension, e.g. GraphName.txt.
7) A Rename message may appear as you have changed the file extensive from csv to txt.
Note If the rename message does not appear you may need to switch on the document extensions to complete this action. To do this, go to My Computer and select Organise and then Folder and Search Options. Then go to the view tab and un-tick hide extensions for known files type
***PLEASE GO BACK AND RE-TICK THIS FIELD once the action is completed***
Uploading Ref Graph to Med-eBase
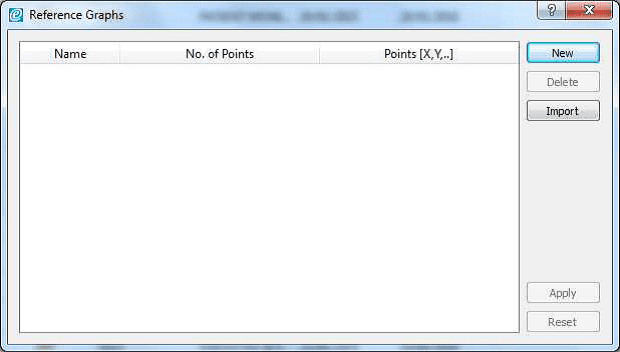
8) Open Med-eBase software and go to Tools > Reference Graph…
9) Once in the Reference Graph menu select Import and then locate and select the txt file previously created. Once selected press Save on the window
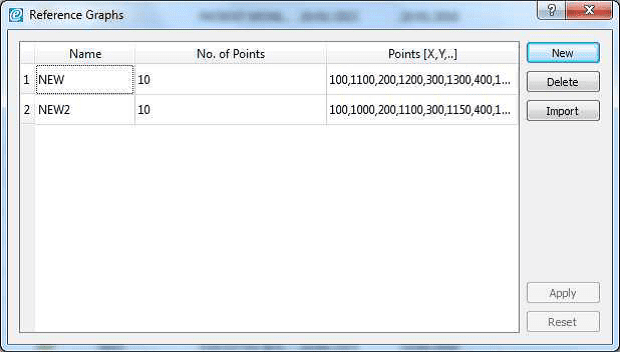
10) The graph should now be shown in the main window of the Reference Graph menu with the title you indicted in the far left name filed, the number of points and the {x,y] positions.
11) Select apply to save the graph into Med-eBase
Note: You will need to import an Upper and Lower graph for each device/test.
Using your Uploaded Reference Graph
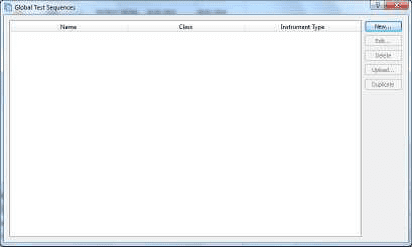
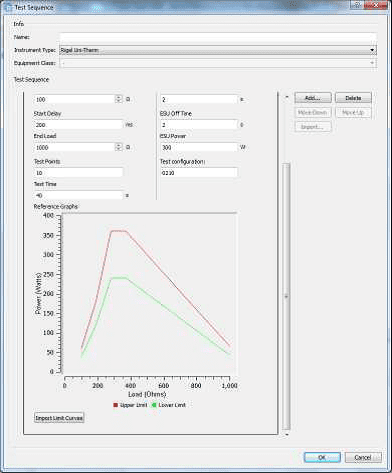
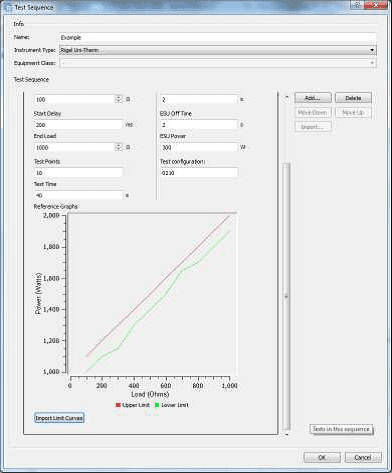
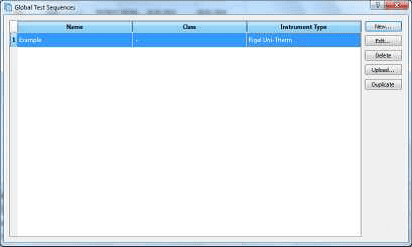
1) To use the uploaded Reference Curve go to Tools > Global Test Sequences
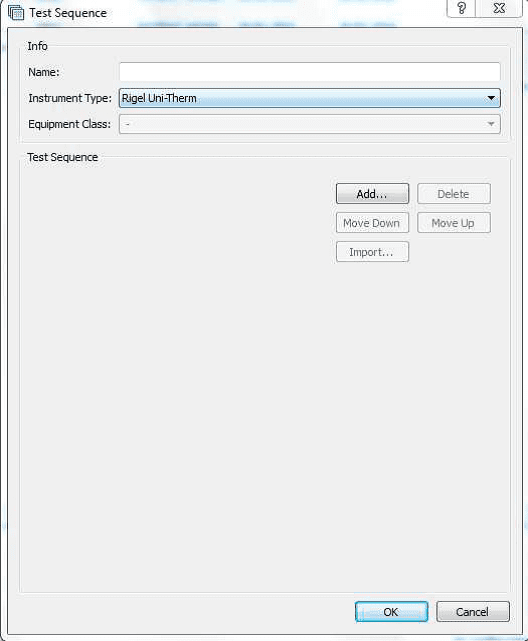
2) Select New > Select the instrument type Uni-Therm and give the test sequence a name.
3) Then go to Add > select Graph Power Test. You can then open and change the settings for this test by pressing the icon.
This includes inserting a custom Upper and Lower Reference Graph by selecting Import Limit Curves
4) Insert a custom Upper and Lower Reference Graph by selecting Import Limit Curves. Select the Upper and Lower limit and then select Ok.
5) The limits will then appear on the Power Curve.
6) Once selected select OK and then Ok to close the test sequence window.
7) The test sequence can then be uploaded on the Rigel Uni-Therm and the test sequence selected to test.
Uploading the sequence onto the Rigel Uni-Therm
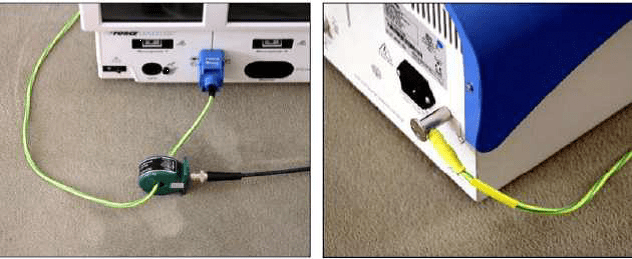
1) Connect the USB A/B lead between the Rigel Uni-Therm and PC.
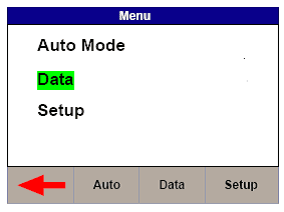
2) On the Rigel Uni-Therm select F1 Menu then F3 Data.
3) Select F2 OPERATION to indicate Import Test Sequence and select F3 PORT to select USB PC Connection. Alternatively you can use a USB memory stick and select USB memory stick as the PORT selection.
4) Select Start when you are ready to receive the test sequence file from Med-eBase. Then DO NOT select OK!
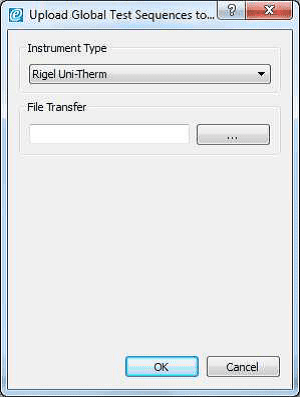
5) On the PC open Med-eBase go to Tools > Global Test Sequences. Highlight the sequence and then select upload.
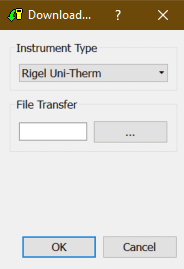
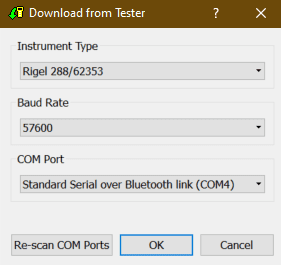
6) The Instrument type should be Uni-Therm and then select …
12) Select the removable drive that has now appeared for the Uni-Therm. Make sure the file name is Sequences_X.sss (X can be any given name).
13) Select save and then on the upload screen OK.
14) Then on the Uni-Therm select OK to complete the IMPORT.
Register your product today to activate your warranty and to stay up to date with the latest product updates, news and support information.
If you wish to calibrate your Uni-Therm, please locate the nearest service center or contact us directly using the link below.
Sign up to our mailing list today to stay up to date with the latest industry news and information from Seaward.