
Specifications & Manuals

Med-eBase User Manual
Manual
Rigel Medical Brochure
Manual
Med-eBase Datasheet
Datasheets
FAQs and Articles
What is the process for transferring data between the Uni-Therm and Med-eBase?
This application note explains how to communicate results, test sequences etc. between the Rigel Uni-Therm and Rigel Med-eBase software.
Downloading results from the Uni-Therm to Med-eBase
On the Uni-Therm:
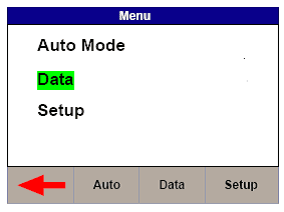
1) Go to Menu, Data, and Data Transfer.
![]()
2) In the Data Transfer menu the user must select USB PC Connection by selecting Port.
![]()
3) Then the correct Operation must be chosen. The operations are divided into Export or Import and also into format or type of file e.g. SSS, CSV Full, CSV Summary, Test Sequence, Results, Ref Graph. The user will need to select the appropriate operation which for downloading results would be Export SSS and then press Start.
4) Connect a USB cable between the Rigel Uni-Therm and the PC making sure you use the lower of the two
USB connectors on the side of the Uni-Therm
5) This will then lead to the Transfer Ready screen which will then tell you to copy the results file using Med-eBase.
On Med-eBase:
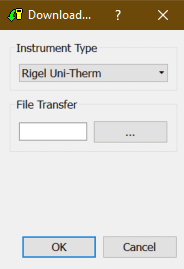
1) Select Download from Tester and select Uni-Therm.
![]()
2) Then press the ... button for the file transfer. From here you will need to save the results from the removal disk (which is the Uni-Therm) which will then download into Med-eBase.
Uploading Test sequences from Med-eBase onto the Uni-Therm
On the Uni-Therm:
1) Go to Menu, Data, and Data Transfer.
2) In the Data Transfer menu the user must select USB PC Connection by selecting Port key and Import Test Sequences using the Operation key
3) Then select Start
4) Connect the USB cable between the Rigel Uni-Therm and the PC
On Med-eBase:
1) Firstly the user would need to create a test sequence using Med-ebase.
2) Once the test sequence is created select ok to return to the main global sequence menu.
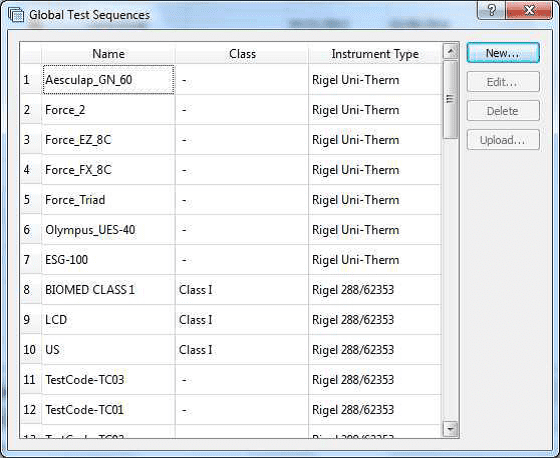
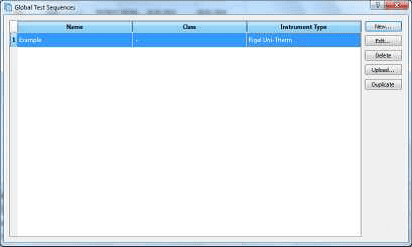
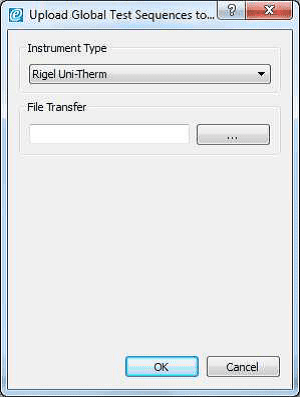
3) From the global test sequence menu select the sequence and then Upload. The screen below will then appear.
4) The user must make sure the correct instrument type is selected and then click on the … for file transfer.
5) Then select the removal disk (Uni-Therm) so save the sequence onto the Rigel device
6) Select Save and then Ok.
On the Uni-Therm
1) Select OK
2) Then the Import Complete screen should appear to indicate that the import is complete
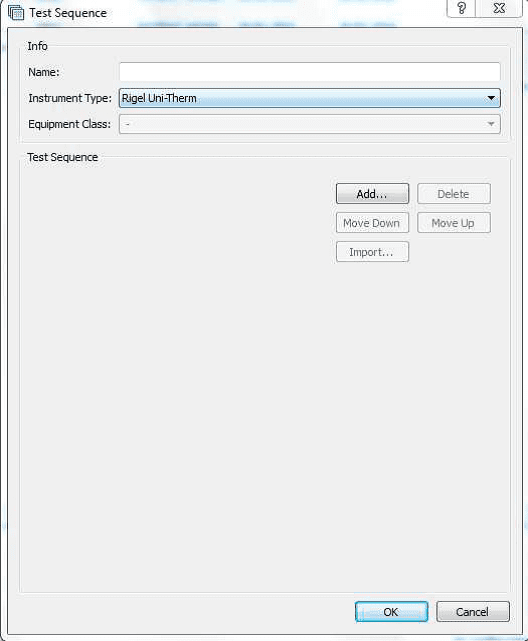
3) To confirm the test sequence has been uploaded go back to the main menu select Menu, then Setup and then Test Sequences. In the Test Sequence screen the name of the global test sequence should be visible. From here the user can view and edit the test sequence or run the test on the Uni-Therm.
How do I download data from the UniPulse 400 to Med-eBase?
This application note details how to download results and communicate between the Uni-Pulse 400 and Med-eBase
On Med-eBase
1) First open Med-eBase Version 2.3 or higher
2) Select the Download from Tester icon which is situated on the top left hand side of the screen or in Tools and Download…
![]()
3) Select UniPulse-400 from the drop down list and confirm the COM port for the USB serial connection.
4) Then select Ok.
On The Uni-Pulse 400
5) From the main menu Select Data by selecting the enter key and then use the up and down arrows to select how you would like to search for the results to download; Asset ID, Make, Model, Serial number etc. then select F5 Search to find results.
6) Selecting F4 Download to PC allows the user the either Download selected items or Download all search items?
7) Then confirm selection with F4 confirm.
8) Then select USB or Bluetooth. Then confirm selection with F4 confirm.
Note: Currently Med-eBase transfer can only be conducted via USB.
9) During transfer a bar appears on both Med-eBase and the Uni-Pulse
10) When the download is complete and summary box appears on Med-eBase to enable the user to view what has been downloaded successfully.
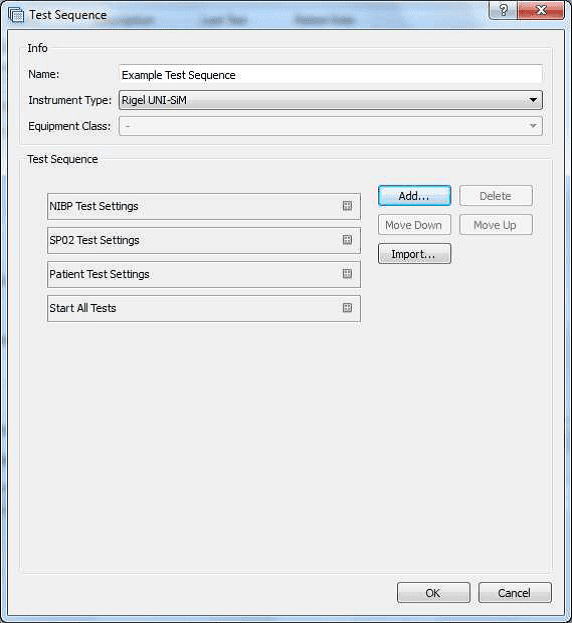
How do I create test sequences for the Rigel Uni-Sim on Med-eBase?
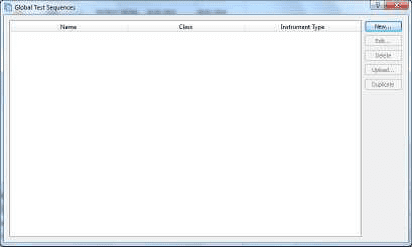
1) To create a test sequence in Med-eBase select the Global Test Sequence icon or select Tools > Global Test sequence
2) Select New
3) Enter the sequence name and also the instrument type.
Note: For Rigel 288/62353 you will also need to classify the equipment class. Sequences are for one device type only and therefore cannot mix tests from different Rigel devices (e.g. electrical safety and Vital sign simulations)
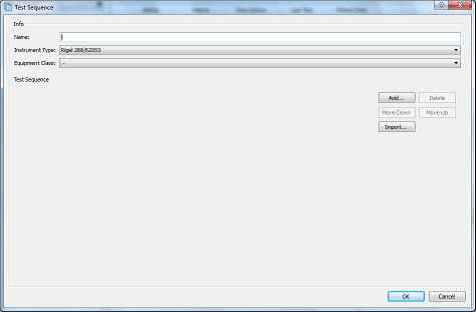
4) Select Add to insert a test or import to import an already created global test sequence. For the uni-Sim test option are shown in the following image
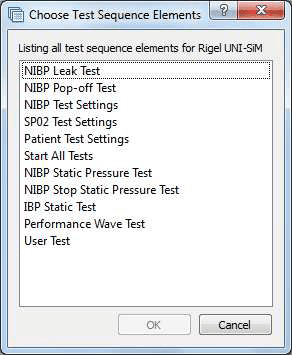
5) The user can select multiple tests by holding ctrl when selecting and the order of selection is remembered in the sequence when OK is selected.
6) Select the Expand icon on each individual test to change the test setting and during of test in the Start All Tests field.

7) After each group of simulations the start all tests must be inserted so that each simulation or change of settings has a set time for the Uni-Sim to recognise.
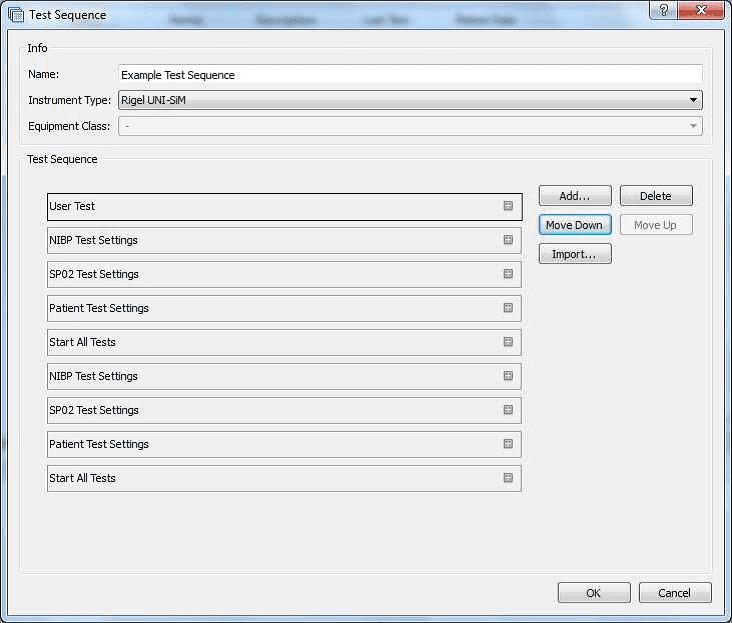
8) Once the test sequence is complete select OK.
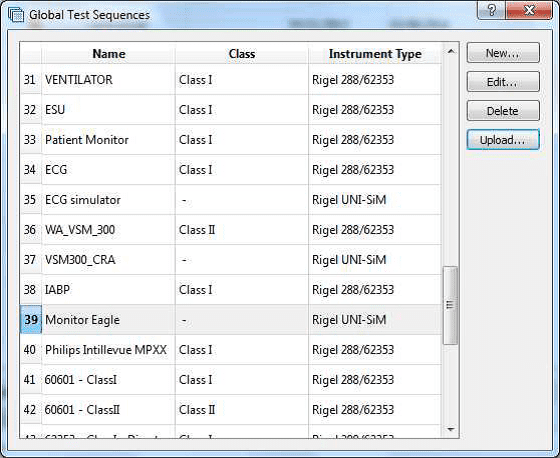
9) To upload the test sequence into the Uni-Sim highlight sequence and select upload
10) Select the correct instrument type, baud rate and COM port
Note: The Bluetooth connection is initiated by the Rigel device. Outgoing COM port is downloading to the PC and incoming and is uploading into the Rigel device
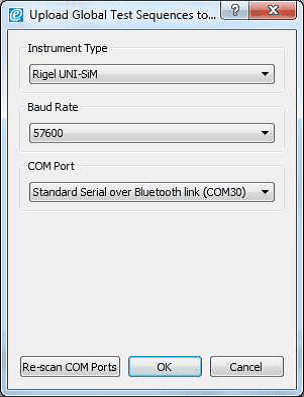
11) Then select OK
12) Select Ok when Bluetooth icon appears in right hand corner of Rigel Uni-Sim.
13) To confirm test sequence has been uploaded successful on the Uni-Sim go to Menu> Set up > Test Sequences and the name of the new sequence should be added to the list.
Can I create and upload test sequences for the 288+ on Med-eBase?
The Global test sequence function allows the user to create test sequences on Med-eBase rather than on the device itself and then upload it onto the device. It lets you save the sequence on Med-eBase and can therefore be uploaded onto multiple Rigel 288+ devices for example.
On Med-eBase:
1) On Med-eBase there is two ways to create a global test sequence from the top left menu go to Tools > Global test Sequence or the global test sequence icon on the task bar.
2) From the Global Test Sequence Menu select New.
3) Select new and a screen appear to allow the user to create the sequence after choosing the device and standard (if applicable).
4) For example a Rigel 288+ test sequence could look like the sequence below.
5) Use the Add button to add an additional test and the Use the move up/move down icons allow the user to
customise the test order. The + icon at the end of each individual test to open the test options. This allows you to change limits (if required), timings and number of tests etc.
6) Once you have created your sequence confirm by selecting OK. You will redirect back to the global test sequence menu where you ‘New’ sequence should be located. From this menu you can highlight the sequence and select Upload to send the sequence to your Rigel 288+.
7) The standard upload/download menu appears. And the user needs to confirm the device, baud rate and COM port. Once confirmed select OK.
On the Rigel 288+:
8) Select F4 from the Main Menu.
9) Select D or Data Transfer and then U Upload from PC.
10) An hour glass appears in the right hand corner while the Rigel device pairs with the PC Bluetooth and should turn to a Bluetooth sign when it is connected.
11) F4 Send to send data to the tester.
12) Once the download has started, a progress bar will appear
13) Upon completion of the upload, the summary window will be displayed
How do you upload a Power Reference Graph to Med-eBase?
This guide will take you through the steps required to upload a Power Reference Curve to the Rigel Med-eBase software for use when creating a test sequence for the Rigel Uni-Therm Electrosurgical Analyser.
Equipment required:
- PC with Med-eBase software
- Reference Graph
Note: You will require two reference curves, one for the upper limit and one for the lower limits for each specific device
Create Reference Curve
1) Open the file ‘RefGraphtemplateMB.csv’ which accompanied this document as a download fromRigelmedical.com. Please
see the example below also:
[REFGRAPH],
Graph Name,
10,
100,1100,
200,1200,
300,1300,
400,1400,
500,1500,
600,1600,
700,1700,
800,1800,
900,1900,
1000,2000,
[END],
Note: One comma is required at the end of every line and between numbers. Therefore when the curve is created in excel please reopen the curve in notepad (or similar) to check locations of commas is correct.
2) [REFGRAPH] and [END] must remain at the beginning and end of the file.
3) Graph Name is the name of the reference curve and can be changed. This will be the name of the graph which will be shown once imported into Med-eBase.
4) 10 is the number of points on the graph, this can be changed but the lines of data must reflect this number.
5) Column A in excel should be the X axis, and represents the Load (). Column B is the Y axis and represents the Power (W). In this example line 3 is a plot of 100Wat 100. In Excel commas are not required but please check they are visible in notepad/word format.
6) Once you have completed plotting the point in the CSV file, Select File and then Save As. Save the file with a recognisable name and .txt extension, e.g. GraphName.txt.
7) A Rename message may appear as you have changed the file extensive from csv to txt.
Note If the rename message does not appear you may need to switch on the document extensions to complete this action. To do this, go to My Computer and select Organise and then Folder and Search Options. Then go to the view tab and un-tick hide extensions for known files type
***PLEASE GO BACK AND RE-TICK THIS FIELD once the action is completed***
Uploading Ref Graph to Med-eBase
8) Open Med-eBase software and go to Tools > Reference Graph…
9) Once in the Reference Graph menu select Import and then locate and select the txt file previously created. Once selected press Save on the window
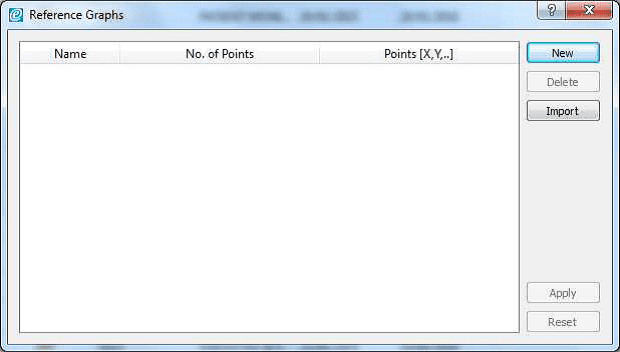
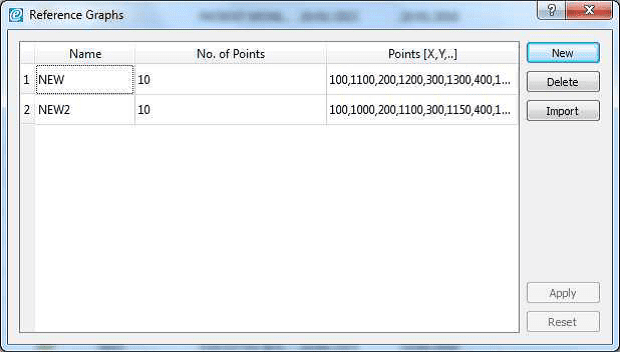
10) The graph should now be shown in the main window of the Reference Graph menu with the title you indicted in the far left name filed, the number of points and the {x,y] positions.
11) Select apply to save the graph into Med-eBase
Note: You will need to import an Upper and Lower graph for each device/test.
Using your Uploaded Reference Graph
1) To use the uploaded Reference Curve go to Tools > Global Test Sequences
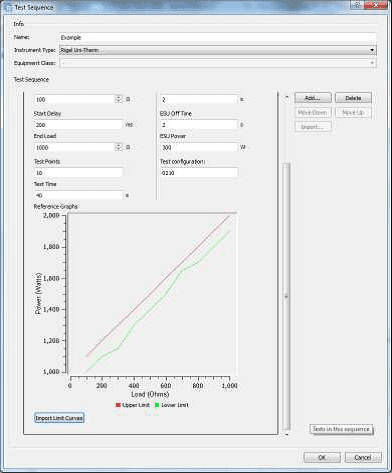
2) Select New > Select the instrument type Uni-Therm and give the test sequence a name.
3) Then go to Add > select Graph Power Test. You can then open and change the settings for this test by pressing the icon.
This includes inserting a custom Upper and Lower Reference Graph by selecting Import Limit Curves
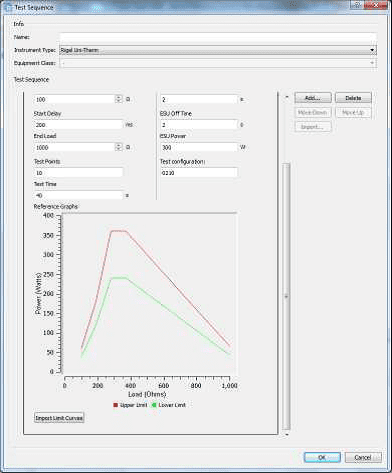
4) Insert a custom Upper and Lower Reference Graph by selecting Import Limit Curves. Select the Upper and Lower limit and then select Ok.

5) The limits will then appear on the Power Curve.
6) Once selected select OK and then Ok to close the test sequence window.
7) The test sequence can then be uploaded on the Rigel Uni-Therm and the test sequence selected to test.
Uploading the sequence onto the Rigel Uni-Therm
1) Connect the USB A/B lead between the Rigel Uni-Therm and PC.
2) On the Rigel Uni-Therm select F1 Menu then F3 Data.
3) Select F2 OPERATION to indicate Import Test Sequence and select F3 PORT to select USB PC Connection. Alternatively you can use a USB memory stick and select USB memory stick as the PORT selection.
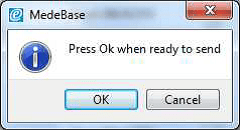
4) Select Start when you are ready to receive the test sequence file from Med-eBase. Then DO NOT select OK!
5) On the PC open Med-eBase go to Tools > Global Test Sequences. Highlight the sequence and then select upload.

6) The Instrument type should be Uni-Therm and then select …
12) Select the removable drive that has now appeared for the Uni-Therm. Make sure the file name is Sequences_X.sss (X can be any given name).
13) Select save and then on the upload screen OK.
14) Then on the Uni-Therm select OK to complete the IMPORT.
Rigel Medical Brochure
How do you download results from the UniPulse 400 to Med-eBase?
This application note details how to download results and communicate between the UniPulse 400 and Med-eBase. Note this can only be performed when the UniPulse 400 is connected to the PC using a USB lead.
On The UniPulse 400:
1) From the main menu use the up and down keys and Select Data using the Enter key and then again use the up and down keys to select how you would like to search for the results to download.
2) (a) The keyboard can be used to enter the Asset ID, Make, Model, Serial number or Date(s) and then searched using F5
Note, the Bluetooth scanner can be used to enter the Asset ID and Serial number.
or
(b) The left and right keys can be used to select the Test type or Test status and then searched using F5.
or
(c) Find all test results by selecting F5 without making any changes.
Note: Any changes can be reset using the delete F3.
3) The Search results screen allows assets to be deleted using F2, printed using F3, downloaded to PC using F4 or viewed on the instrument using with F5.
4) Selecting download to PC, F4 allows the user to select either Download selected item? or Download all search items?
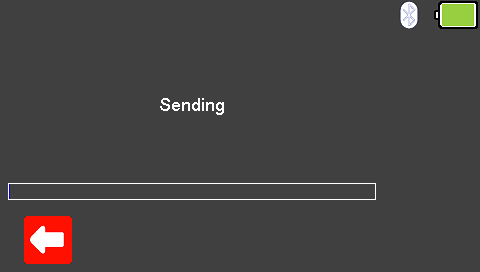
5) This selection is confirmed with F5, the instrument will then displays the sending screen.
On Med-eBase:
6) Using Med-eBase version 2.6 or higher.
7) With a database open, select the Download from Tester icon which is situated on the top left hand side of the screen or in Tools and Download…
![]()
8) Select UniPulse 400 from the Instrument Type drop down and confirm the COM port for the USB serial connection.
Note: the Set UP400 Clock using computer time can be used to set the time on the UniPulse 400 if required.
9) Select Ok.
10) During transfer a bar appears on both Med-eBase and the UniPulse 400 or UniPulse.
11) When the download is complete a Download Report appears on Med-eBase to enable the user to view what has been downloaded successfully.
12) On the instrument, Sending complete will be displayed.

How do I upload ‘O Curves’ onto Med-eBase?
To add an ‘O Curve’ onto the Med-eBase V2 software you will need to add the ‘O Curve’ to a folder structure which is outside of Med-eBase.
1) For Windows 7 and 10: Go to C:ProgramDataRigelMed-eBase V2OCurves
Note: ProgramData may be hidden folders. To view this folder in Windows 7 go to Organize then Folder, select the View tab and “Show hidden files and folders”, click Apply and then Ok. In Windows 10 select View, Options then select the view tab. Select “Show hidden files and folders”, click apply then OK.
2) The original csv file used to download the ‘O Curve’ onto the Uni/BP Sim needs to be altered by erasing lines 1 to 4. Then the csv file needs to be saved in the follow folder structure which is critical for loading ‘O Curves’ onto Med-eBase:
080_040.csv.
3) Re-open Med-eBase V2 and click on Tools, then Global Test Sequences and then New.
4) Then select BP/Uni Sim and enter the name of the new test sequence.
5) Add… then select ‘NIBP Test Setting’, click on the + and there will be a drop down list in Monitor Type field where you can select your ‘O Curve’.
6) Then in the Adult/Infant field select the type of patient and the chose the Systolic/Diastolic field to select the exact ‘O Curve’ you want to add to the test sequence.
What is the process for uploading and downloading test sequences between the Uni-Therm and Med-eBase?
This application note explains how to upload global test sequences created in Med-eBase onto the Rigel Uni-Therm, how to download test sequences created on the Uni-Therm into Global test sequence on Med-eBase.
Upload a global test sequence
On the Rigel Uni-Therm:
1) Go to Menu, Data, and Transfer Data.
![]()
2) In the Data Transfer menu the user must select USB PC Connection by selecting the Port key and Import Test Sequences using the Operation key. Then select Start
Note: DO NOT press OK as this will end the upload
3) Now connect the USB cable between the Rigel Uni-Therm and the PC making sure you use the lower of the two USB connectors on the side of the Uni-Therm.
On Med-eBase:
4) Firstly the user would need to have created a global test sequence on Med-eBase.
5) To upload the test sequence select either Tools> Global Test Sequence or the page icon on the top left hand side of the Med-eBase screen to open the Global Test Sequence menu.
6) Highlight the test sequence(s) that shall be uploaded and select Upload from the right hand side of the screen.
7) The upload global test sequence menu will appear and the user must indicate the instrument type. Then select the file transfer icon.
8) Then the user must select the removal disk which is the Uni-Therm memory (for example removal disk E:) to allow the test sequence to be saved onto the Uni-Therm.
9) The file must be named in the format Sequence_FileName.sss (Where File name can be anything e.g. SEQUENCE1) and then select Save.
10) Then select OK to upload the sequence onto the Uni-Therm. Go back onto the Uni-Therm
11) Select OK from the Import data screen,
12) Then the Import Complete screen should appear to indicate that the import is complete
To confirm the test sequence has been uploaded
13) Go back to the main menu select Menu, then Setup and then Test Sequences.
14) In the Test Sequence screen the name of the global test sequence should be visible.
15) From here the user can view and edit the test sequence or run the test on the Uni-Therm.
B) Download test sequence created on Uni-Therm
1) Test sequences can be created, copied and edited in the Uni-Therm from Menu > Setup> Test Sequences
2) To download the Test sequence from the Uni-Therm to Med-eBase where it can be used as a global test sequence go to Menu> Data> Data transfer
3) In the Data Transfer menu the user must select USB PC Connection by selecting the Port key and Export Test Sequences using the Operation key.
4) Then select Start and connect the USB cable between the device and the PC
5) Open Med-eBase and select download from tester by either Tools > Download or the download icon
![]()
6) Chose the instrument type and then select the file transfer icon
7) Then the user must select the removal disk which is the Uni-Therm memory (for example removal disk E:) to allow the test results to be transferred from the Uni-Therm.
8) Select the appropriate file which should be in a format of Sequence_X_Y.sss.(Where X and Y are numbers) and then select OK
9) The file name should appear in the file transfer window and then select ok to transfer into Med-eBase
10) A download report will appear when the transfer is complete to indicate what has been transferred
11) To view the global test sequence in Med-eBase select either Tools > Global Test Sequence or the icon on the top left hand side of the Med-eBase screen to open the Global Test Sequence menu. From this menu the test sequence can be viewed, edited and uploaded onto the Uni-Therm.
How do I use Multi-Flo in Remote Control mode on Med-eBase?
To use the remote control mode the user will need to install the Gadget Serial V2.4 Driver. The Gadget serial driver is available at rigelmedical.com in the download section. To install the gadget serial driver the Multi-Flo needs to be turned on and connected to the PC using the USB serial cable.
Equipment required:
- Multi-Flo
- PC running Med-eBase V2.4 or higher
- Gadget serial driver install files
- USB Serial cable or memory stick
1) On the Multi-Flo menu scroll down and select remote control mode. The Multi-Flo will then try to connect with the PC.
2) The PC will attempt to download the install drivers for the gadget serial. As the driver is located on the PC and cannot be found on the internet this step is not required. Click on the icon when it appears as seen below.
3) Select “skip obtaining driver software” which is blue and underlined to stop widows looking for driver as the Rigel device won’t be able to connect to the PC while the computer is performing this task. Select yes on the driver software installation screen to skip the driver update.
4) Once this is complete open the Control Panel and go to ‘Devices and Printers’. The gadget serial will be an unspecified device. Right click on the gadget serial and select properties.
5) In the General tab select Update Drivers and then choose ‘Browse my computer for driver software’.
6) Select the folder where the gadget serial files are located. Select Ok to choose the folder and then next.
7) Once the driver is installed select next and then close the Control Panel.
To confirm the gadget serial driver is installed correctly:
8) Open Med-eBase V2.4making sure the Multi-Flo is connected and in Remote Control Mode.
9) On Med-eBase select ‘Download from Tester’ by either selecting Tools > Download or the icon.
10) Choose Multi-Flo as the instrument type and then select Gadget serial as the COM port.
Note: If Med-eBase was open while installing the gadget serial driver the user may be required to close Med-eBase and reopen it or Rescan
COM ports to locate the gadget serial.
Can I print a multiple results for a group of assets on Med-eBase?
The print function can allow for an individual asset result or multiple result certificates to be printed. Results certificates must be of the same type (e.g. 288) and under the same client, in the asset browser, to be printed in multiples.
1) You would need to select the first asset from the main asset browse screen
2) Then while pressing ctrl select any additional assets. All selected assets should be highlighted.
3) Then select the Print icon on the right hand side and select the Device type.
4) Then select OK and the generate certificate menu opens to allow you to scroll through the certificates, set the template and add additional details etc before printing or saving the certificates as PDF.
How do I download data from the Rigel devices to the PC without Med-eBase?
Equipment required:
- Rigel device
- PC/Laptop
- Bluetooth connectivity or RS 232 cable
- DataTransfer.exe for file transfer
There are 3 ways to send test results from the Rigel device to a PC:
1) Bluetooth connection
2) Serial connection using the RS 232 cable
3) USB (Only applicable for Performance Analysers)
Bluetooth connection
To download via Bluetooth the download is always initiated by the Rigel tester and can be saved as:
i. Text file
ii. Csv file
iii. To Med-eBase as SSS file (Please see the FAQ ‘How Do I Download Data from the Rigel Devices to Med-EBase?’)
Make sure the PC and Rigel device are paired via Bluetooth Favourites on the device (Please see FAQ ‘What’s the process for pairing devices using Bluetooth favourites’)
For 288+ and Sim Range test instruments
1) Select F4 and then D Data transfer.
2) On the PC, open the DataTransfer.exe program (This is available as a free download from rigelmedical.com).
3) Select Capture then start capture (See Figure 1)

Figure 1. Start capture on DataTransfer.exe
4) Choose a save name and location and change the file type to either .csv or .txt and press Save (See Figure 2)
![]()
Figure 2. Save file type on DataTransfer.exe
5) Back on the Rigel device select D Download to PC then F4 to confirm
6) An hour glass appears in the right hand corner while the Rigel device pairs with the PC Bluetooth and should turn to a
Bluetooth sign when it is connected.
7) F4 Send to start sending data from the tester.
8) Once the transfer of data is complete go to the Datatransfer.exe program select Capture then stop capture.
9) The data will now be saved in your chosen location as either a csv or txt file.
Serial connection using the RS 232 cable (Rigel 62353+)
To download using RS 232 the connection use the same method as for Bluetooth however the COM port will always be through COM1.
For Performance Analysers (Uni-Therm)
1) Select Menu, then Data and Transfer Data (See Figures 3 & 4)
![]()
Figure 3. Uni-Therm Data Figure 4. Uni-Therm Transfer Data
2) Follow steps 2 to 4 from previous method.
3) On the Uni-Therm press F2 Format to change the file format to either CSV Full or CSV Summary for transfer to PC.
4) Press F3 Port to change the download port to Bluetooth (See Figure 5)
![]()
Figure 5. Changing the download port
5) Press F4 START to begin the transfer.
6) When the Data Transfer is complete follow steps 8 and 9 from previous method.
Serial connection using the RS 232 cable
To download using RS 232 the connection use the same method as for Bluetooth however the COM port will always be through COM1.
USB connection Performance Analysers only (Uni-Therm)
1) Install the ERT1557USB driver. (This driver is available as part of the Uni-Therm firmware download, or on request from support@rigelmedical.com)
2) Connect the USB lead between the Rigel unit and the PC.
3) Select Menu, then Data and Transfer Data
4) Select F2 Format and change it to USB.
5) Open DataTransfer.exe and select COM1 from the drop down menu and then set the Bits per second field to 115200 and click Apply.
6) Follow the steps from previous method using Datatransfer.exe program
What’s the process for customising Med-eBase certificates?
1) All certificates are located in: C:ProgramDataRigelMed-eBase V2CertificatesTemplates for Windows 7 and Windows 10.
Note: ProgramData may be hidden folders. To view this folder in Windows 7 go to Organize then Folder, select the View tab and “Show hidden files and folders”, click Apply and then Ok. In Windows 10 select View, Options then select the view tab. Select “Show hidden files and folders”, click apply then OK.
2) Then select the relevant tester type folder e.g. Rigel 288_62353 (See Figure 1) and copy the relevant report folder e.g. _default (en).
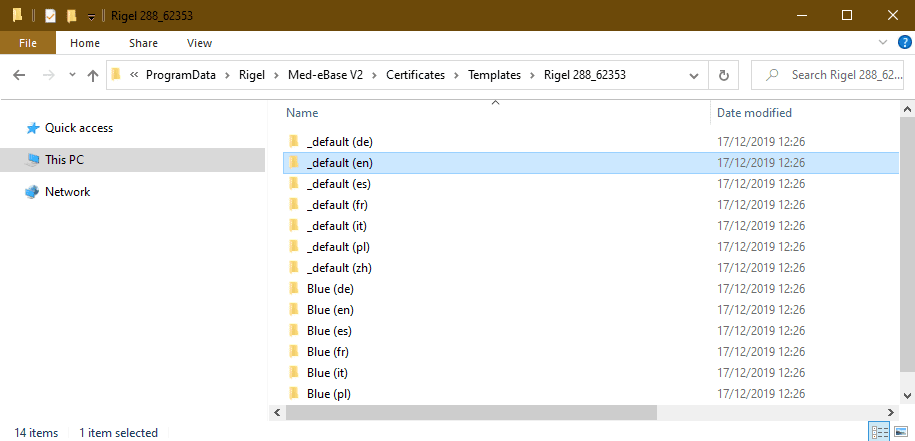
Figure 1: Folder select for customised certificates
3) The copied folder needs to be renamed with a relevant name as this is what will appear on the dropdown list of certificate templates to choose from in Med-eBase E.g. "Customised", as shown in Figure 2.
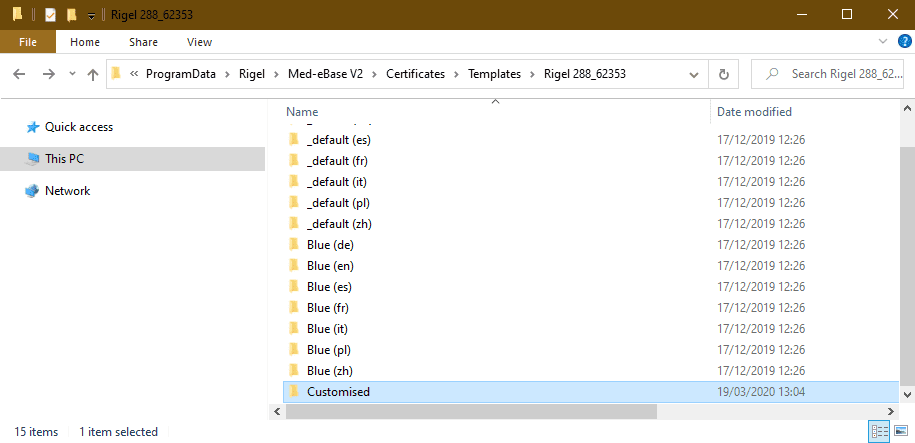
Figure 2: Example of a customised folder
Note: If the customised template folder is not renamed it could be overwritten when new versions of Med-eBase are installed.
4) Select the copied folder and then open the file in either notepad or notepad++ to enable editing
Note: Notepad ++ provides an easier layout to follow as is an open source program which can be download from the internet.
5) Select Ctrl F and find the title which you want to customise. e.g. test protocol. However you can ONLY edit words with the character string "label"> :
and the new phase is entered in between the arrows. On Notepad ++ changeable these words are in black (See Figure 3).
Notice: On notepad ++ do not change any words in GREEN (See Figure 4) as this is information that comes from the Rigel tester. If this is changed the information will not be transferred from the results onto the certificate
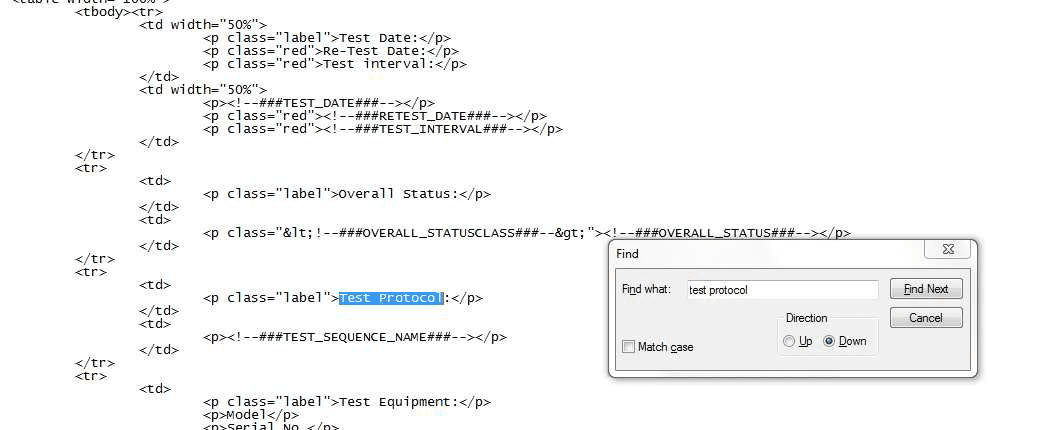
Figure 3: Title customisation
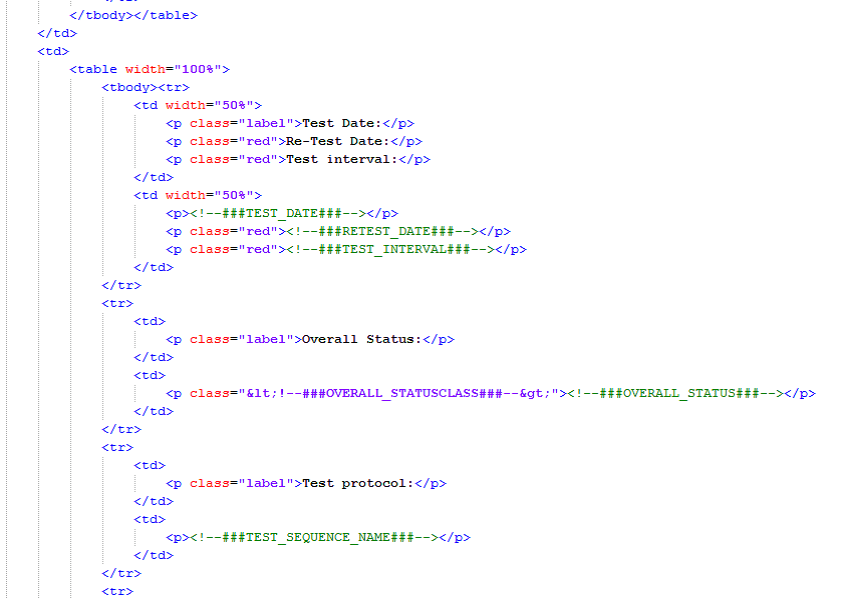
Figure 4: Notepad++ word editing
6) Then open Med-eBase, select the test asset you want to print and then select the print icon. This takes you to the certificate screen where the dropdown menu for templates should include your customised template
How do I download data from the Rigel devices to Med-eBase?
There are two ways to download data from the Rigel range which is dependent on which Rigel product you are using. The methods are divided into A and B:
A. Electrical Safety Analysers (288+, 62353+) and Vital Signs Simulators (Uni-Sim, BP Sim and SP-Sim)
B. Performance analysers (Uni-Therm, Uni-Pulse 400, Multi-Flo)
1) Downloading from any Rigel device to Med-eBase can be initiated from the Download option in the Tools menu or by using the Download icon on the taskbar (See Figure 1)
![]()
Figure 1. Download icon from Med-eBase.
2) After selecting the Download option, the Download from Tester dialogue box will be displayed depending on the tester. For Electrical Safety and Sim Range see Figure 2 and for Performance Analysers see Figure 3.
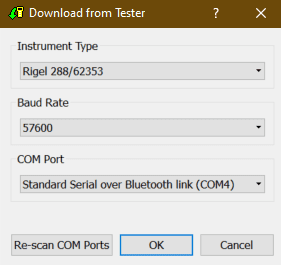

Figure 2. Method A Figure 3. Method B
3) With either method select the relevant Instrument Type from the drop down list.
Method A
Ensure you have the correct Baud Rate (the default is 57600) and COM Port selected. The COM port is defined by your Bluetooth connection. For data cable connection using RS 232 cable this will be COM1 and this will need to be set at 9600.
If you do not see the correct COM Port displayed in the drop down menu, select Re-scan COM Ports to refresh the available COM Port list.
Select OK to begin the download.
Note: The download is always initiated by the Rigel tester.
1) Select F4
2) Select D or Data Transfer and then D or Download to PC.
3) An hour glass appears in the right hand corner while the Rigel device pairs with the PC Bluetooth and should turn to a Bluetooth sign when it is connected.
4) F4 Send to send data to the tester.
Note: If using an RS-232 adaptor the device will say connected immediately. Please wait a few seconds between selecting download on Med-eBase and Send (F4) on the tester
To download to Med-eBase make sure the format is set to Rigel SSS. Once the download has started, a progress bar will appear. Upon completion of the download, the download window will close and a download report will be displayed showing the number of downloaded assets, the pass and fail status etc. of all the downloaded results.
Method B
Select the File Transfer button on the Download from Tester dialogue box to browse to your test instrument.
Browse to your test instrument and select the relevant SSS file then select Open. The file path will be added to the Download from Tester window.
Once the download has started, a progress bar will appear.
Upon completion of the download, the download window will close and a download report will be displayed including the pass and fail status of the downloaded assets.
How do you install Rigel Med-eBase onto a PC?
To install Med-eBase Asset Management software V2, you will need to meet the minimum system requirements listed below.
Hardware
· IBM compatible 1 GHz or higher processor
· 512 MB of RAM
· 350 MB available hard drive space
· Colour monitor with 32-bit colour capability
Software
· Windows XP SP2 or later, Windows 7, 8 or 10
· 32-bit/64-bit Operating System
Note: (a) Med-eBase will need to be installed and the licence activated by an Administrator.
(b) make sure, before installing, Med-eBase ensure no other applications are running.
If you are using the installer package downloaded from the rigelmedical.com website, open the Rigel Med-eBase Installer .exe file to begin the installation from: https://www.rigelmedical.com/rigel-downloads?id=Software%20Download
Follow the onscreen instructions to complete the installation. The language setting can be changed from the installation language once the software is fully installed. Once the program is installed, a shortcut will be provided on your desktop. Double click the shortcut with your mouse to open Med-eBase V2.
How do I register my Med-eBase license on Windows 7?
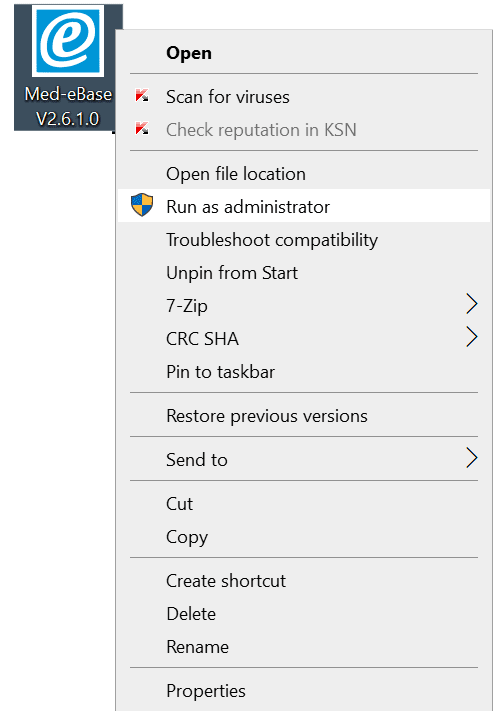
1) Download Med-eBase from rigelmedical.com. A Med-eBase icon should appear on your desktop.
2) Right click on the desktop icon and select "run as administrator", then double clicking on the icon to start the activation process.
3) The installation process will then start automatically with Med-eBase licence activation wizard. Follow the onscreen instructions to activate your serial number.
4) Activating online requires an internet connection and is the fastest way to activate a product.
5) Enter your personal and company information and continue to follow the activation steps to complete the registration process.
6) After successful activation close the Med-eBase program then double-click the desktop icon to ensure it opens into the program without requesting the Serial Number to be entered.
Note: An issue is sometimes caused by there being a 'hidden administrator' account on some windows 7 operating systems but when Med-eBase is confirmed to be “run as administrator” the serial number will be permanent when reopening the program.
How can I fix the error code 26 in Med-eBase?
How can I fix the error code 26 in Med-ebase?
If SQL Server install is not Express edition please follow the instructions below:
1. Ensure the program is not running.
2. Open PC registry by selecting Start->Run then typing RegEdit and selecting OK.
3. Navigate to:
\HKEY_LOCAL_MACHINESOFTWAREMicrosoftMicrosoft SQL
ServerInstalledInstances
4. Make a note of the registry value at the above location then close the registry editor.
5. Open Windows Explorer by right-mouse clicking on Start and selecting Explore.
6. Navigate to the Med-eBase install directory, default is as follows unless changed during program installation:
C:Program FilesRigelMed-eBase
7. Open Med-eBase.exe.config with Wordpad or Notepad.
8. Replace SQLExpress (highlighted in the figure 1) with the Installed Instance noted from the registry in step 3.
9. Save the file.
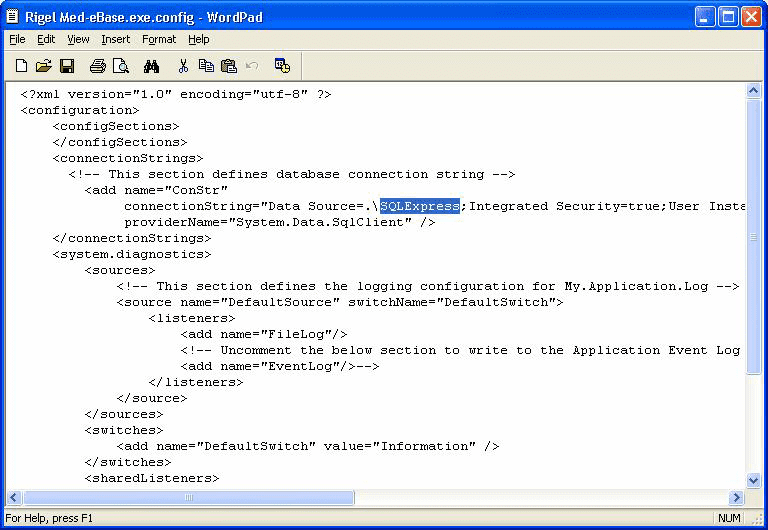
Figure 1
10. Restart the program – no error should be encountered when opening or creating a database.
Rigel Med-eBase Installer V2.6.2 (30 Day Trial included)
Med-eBase Gadget Serial Driver v1
Register Your Product
Register your product today to activate your warranty and to stay up to date with the latest product updates, news and support information.
Software & Firmware
Calibrate your Med-eBase
If you wish to calibrate your Med-eBase, please locate the nearest service center or contact us directly using the link below.
Or tell us what you’re looking for
Stay in the know
Sign up to our mailing list today to stay up to date with the latest industry news and information from Seaward.
Part of the GMC Group

Part of GMC Instruments

Contact us
Email: sales@rigelmedical.com
Switchboard: +44 (0) 191 586 3511
Phone: +44 (0) 191 587 8730


